
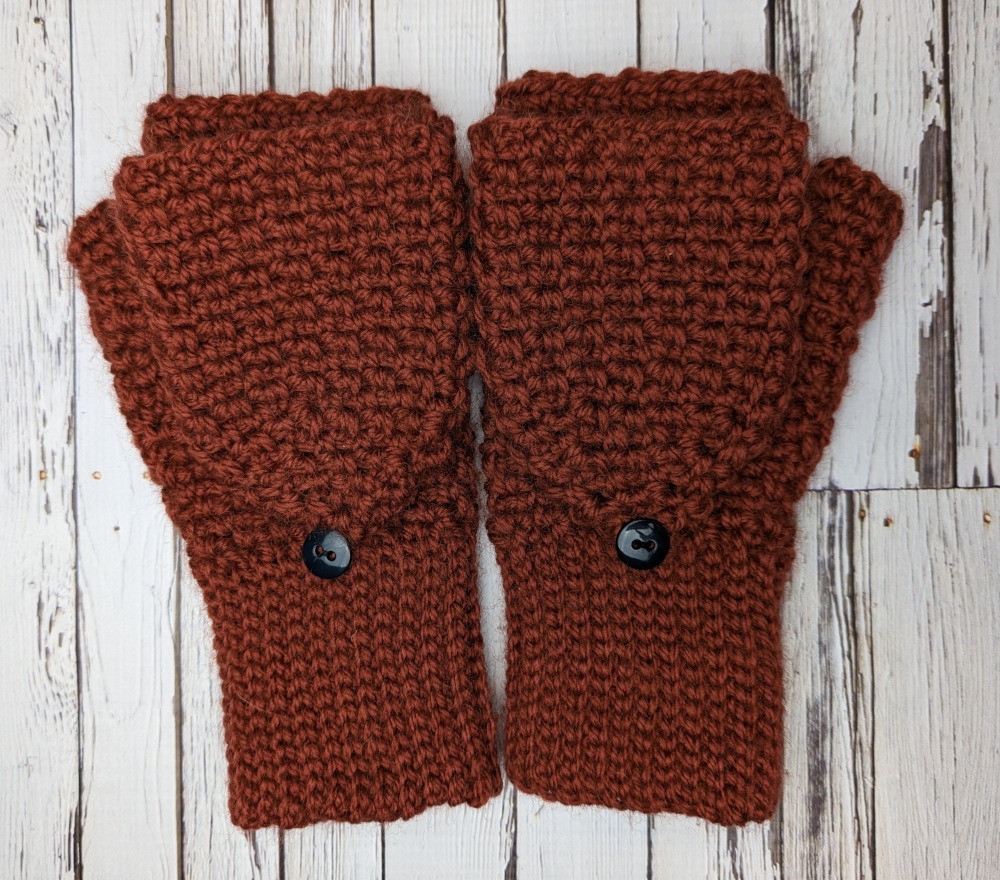
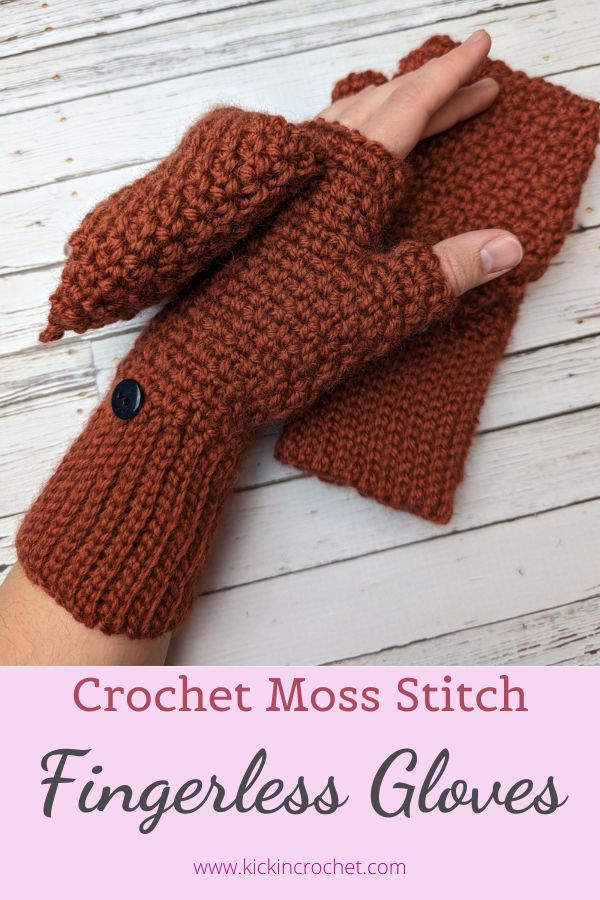
Moss stitch is well-loved stitch by so many crocheters, and fingerless gloves are by far my best selling patterns – put them together and what do you get? Moss stitch fingerless gloves! And this time they’re coming to you as a completely free pattern for ALL sizes. WHAAAAT?! Plus, today only, you can get a free PDF download of this pattern thanks to the Giftstravaganza hosted by Marie from Underground Crafter… Read on for more details and the pattern!
*Disclosure: Some of the links in this post are affiliate links, which means if you click on them and make a purchase I may, at no additional cost to you, earn a commission. Read full disclosure here.

As mentioned, this pattern is completely free right here on the blog. You can also purchase an ad-free PDF copy of the pattern from Ravelry or Etsy.
This pattern was created as part of the Gifstravaganza blog hope with underground crafter. Today only, you can snag the PDF copy from Ravelry for free with code “Giftstravaganza!“

Supplies
- Worsted Weight yarn 180-300y, I used KnitPal Off the Yak Worsted/Aran in Deep Orange (25% yak, 50% wool, 25% acrylic, 120y/100g per skein)
- Size H crochet hook – I love these Odyssey hooks from Furls Crochet!
- Two 1/2 or 5/8 inch buttons if making flaps (5/8″ buttons shown on sample)
- Yarn/Tapestry Needle for weaving in ends.
Stitch Abbreviations
- ch chain
- st(s) stitch(es)
- sc single crochet
- dc double crochet
- F Front dc + ch1
- B Back dc + ch1
- ch Chain
- st(s) Stitch(es)
- sk Skip
- ss Slip Stitch
- BLO Back Loop Only
- sc Single Crochet
- sc2tog Single Crochet Two Together (sc decrease)
Gauge/Sizing
10 sts and 10 rows in 2” (not stretched)
Gauge sample is worked in Moss Stitch:
- Ch any even number of sts, sc in 4th ch from hook, (ch1, sk1, sc in next st) across.
- ch2, turn, sc in ch1 sp, (ch1, sk sc, sc in ch1 sp) across. The last sc will be worked in the space below the ch2 from the start of the previous row.
- Repeat row 2 for gauge swatch.
The pattern is sized for women’s small up to men’s large, based on circumference of the four fingers as measured around the knuckles:
| Size | Inches |
| Women’s Small | 7” |
| Women’s Medium | 7.5” |
| Women’s Large/Men’s Small | 8” |
| Men’s Medium | 8.5” |
| Men’s Large | 9” |
Pattern Notes
This pattern is worked bottom up. You’ll start with a cuff made of slip stitch ribbing. Then you’ll start working along one edge of the ribbing to form the cuff, working up toward the fingers. The flaps are completely optional.
Ch1 at the beginning of a row does not count as a stitch.
All joins are worked as ss to first st
Moss Stitch Video Tutorial
If you’ve never done moss stitch, this short video shows you the basic technique!
How to Crochet Moss Stitch Fingerless Gloves
Women’s Small
Cuff/Setup (Both Gloves)
- ch16, ss in 2nd st from hook and across (15sts)
- ch1, turn, BLO ss across (15sts)
- Repeat row 2 until you have 47 total rows of ss. Join to starting chain with ss’s (or you may sew together). Your join row counts as the 48th row of ss ribbing.
- Ch1, working along the edge of the cuff, think of every 2nd ss row as 1 st (this works out to each ridge in the ribbing counting as one ss)… (sc, ch1, sc2tog, ch1), repeat around, join to starting sc. You should have 16 sc separated by ch1 spaces.
- ch1, turn, (sc in ch1 sp, ch1) around, join (16sc)
- Repeat previous row 1 time. (16sc)
Glove 1
- ch1, turn, (sc in ch1 sp, ch1) 13 times, sc in sc, ch1, (sc in ch1 sp, ch1) 3 times, join (17sc)
- ch1, turn, (sc in ch1 sp, ch1) around, join (17sc)
- ch1, turn, (sc in ch1 sp, ch1) 13 times, sc in sc, ch1, (sc in ch1 sp, ch1) 4 times, join (18sc)
- ch1, turn, (sc in ch1 sp, ch1) around, join (18sc)
- Repeat previous row 1 time.
- ch1, turn (sc in ch1 sp, ch1) 5 times, sc in sc, ch1, (sc in ch1 sp, ch1) 13 times, join (19sc)
- ch1, turn, (sc in ch1 sp, ch1) around, join (19sc)
- Repeat previous row 2 times.
- ch1, turn, (sc in ch1 sp, ch1) 5 times, sc in sc, ch1, (sc in ch1 sp, ch1) 14 times, join, (20sc)
- ch1, turn, (sc in ch1 sp, ch1) around, join (20sc)
- Repeat previous row 1 time.
- Separate for thumb – ch1, turn, (sc in ch1 sp, ch1) 13 times, ch 2 more (total of 3 ch sts here), sk next 5 ch spaces, (sc in ch1 sp, ch1) twice, join (15 sc)
- ch1, turn, (sc in ch1 sp, ch1) twice, (sc, ch1) in 1st ch of ch3 space, and again in 2nd ch of ch3 space, continue working (sc in ch1 sp, ch1) around, join (16sc)
- ch1, turn (sc in ch1 sp, ch1) around, join (16sc)
- Repeat previous row 6 times, or until you reach your desired length for the fingers. Tie off.
- Join yarn to thumb – looking at the seam side of the glove, you’ll join to the same ch1 space that the last sc of the finger section used before the ch3, sc 2 ch1 spaces together, ch1, (sc in ch1 sp, ch1) 3 times, sc 2 ch1 spaces together (the 2nd sp will be the same one used by the sc of the finger section), sc 3 sp together over thumb ch, ch1, join (If you prefer, you can just work 6sc evenly spaced around the thumb. The decreases are intended to help prevent gaps. If the thumb is too tight for you, use one fewer decrease, for a total of 7sc around the thumb). (6sc)
- ch1, turn, (sc in ch1 sp, ch1) around, join (6sc)
- Repeat previous row 2 times or until you reach your desired length for the thumb. Tie off, weave in ends.
Glove 2
- ch1, turn, (sc in ch1 sp, ch1) 3 times, sc in sc, ch1, (sc in ch1 sp, ch1) 13 times, join (17sc)
- ch1, turn, (sc in ch1 sp, ch1) around, join (17sc)
- ch1, turn, (sc in ch1 sp, ch1) 4 times, sc in sc, ch1, (sc in ch1 sp, ch1) 13 times, join (18sc)
- ch1, turn, (sc in ch1 sp, ch1) around, join (18sc)
- Repeat previous row 1 time.
- ch1, turn (sc in ch1 sp, ch1) 13 times, sc in sc, ch1, (sc in ch1 sp, ch1) 5 times, join (19sc)
- ch1, turn, (sc in ch1 sp, ch1) around, join (19sc)
- Repeat previous row 2 times.
- ch1, turn, (sc in ch1 sp, ch1) 14 times, sc in sc, ch1, (sc in ch1 sp, ch1) 5 times, join, (20sc)
- ch1, turn, (sc in ch1 sp, ch1) around, join (20sc)
- Repeat previous row 1 time.
- Separate for thumb – ch1, turn, (sc in ch1 sp, ch1) 2 times, ch 2 more (total of 3 ch sts here), sk next 5 ch spaces, (sc in ch1 sp, ch1) 13 times, join (15 sc)
- ch1, turn, (sc in ch1 sp, ch1) 13 times, (sc, ch1) in 1st ch of ch3 space, and again in 2nd ch of ch3 space, continue working (sc in ch1 sp, ch1) around, join (16sc)
- ch1, turn (sc in ch1 sp, ch1) around, join (16sc)
- Repeat previous row 6 times, or until you reach your desired length for the fingers. Tie off.
- Join yarn to thumb – looking at the side opposite the seam side of the glove, you’ll join to the same ch1 space that the last sc of the finger section used before the ch3, sc 2 ch1 spaces together, ch1, (sc in ch1 sp, ch1) 3 times, sc 2 ch1 spaces together (the 2nd sp will be the same one used by the sc of the finger section), sc 3 sp together over thumb ch, ch1, join (If you prefer, you can just work 6sc evenly spaced around the thumb. The decreases are intended to help prevent gaps. If the thumb is too tight for you, use one fewer decrease, for a total of 7sc around the thumb). (6sc)
- ch1, turn, (sc in ch1 sp, ch1) around, join (6sc)
- Repeat previous row 2 times or until you reach your desired length for the thumb. Tie off, weave in ends.
Flaps (Make 2)
- ch32, join, ch1 (doesn’t count), (sc, ch1, sk1) around, join (16sc)
- ch1, turn (sc in ch1 sp, ch1) around, join (16sc)
- Repeat previous row 12 times
- ch1, turn, *sc 2 ch spaces together, ch1, (sc, ch1) twice, repeat from * around (12sc)
- ch1, turn (sc in ch1 sp, ch1) around, join (12sc)
- (sc 2 ch spaces together, ch1, sc, ch1) around (8sc)
- ch1, turn, (sc in ch1 sp, ch1) around, join (8sc)
- (sc 2 ch spaces together, ch1) around, join (4sc)
- ss 1st and last sc together, ch4, ss remaining two sc together. Tie off, weave in ends.
- Sew one flap onto each glove 2-3 rows below the finger end of the glove. Be sure to sew through only one side of the flap opening so that it can be pulled over the fingers! Sew a button onto the glove at the junction of the ribbing and the glove body. Weave in ends.
![]()
Women’s Medium
Cuff/Setup (Both Gloves)
- ch16, ss in 2nd st from hook and across (15sts)
- ch1, turn, BLO ss across (15sts)
- Repeat row 2 until you have 50 total rows of ss. Join to starting chain with ss’s (or you may sew together). Your join row counts as the 51st row of ss ribbing.
- Ch1, working along the edge of the cuff, think of every 2nd ss row as 1 st (this works out to each ridge in the ribbing counting as one ss)… (sc, ch1, sc2tog, ch1), repeat around, join to starting sc. You should have 17 sc separated by ch1 spaces.
- ch1, turn, (sc in ch1 sp, ch1) around, join (17sc)
- Repeat previous row 2 times. (17sc)
Glove 1
- ch1, turn, (sc in ch1 sp, ch1) 13 times, sc in sc, ch1, (sc in ch1 sp, ch1) 4 times, join (18sc)
- ch1, turn, (sc in ch1 sp, ch1) around, join (18sc)
- ch1, turn, (sc in ch1 sp, ch1) 13 times, sc in sc, ch1, (sc in ch1 sp, ch1) 5 times, join (19sc)
- ch1, turn, (sc in ch1 sp, ch1) around, join (19sc)
- Repeat previous row 1 time.
- ch1, turn (sc in ch1 sp, ch1) 6 times, sc in sc, ch1, (sc in ch1 sp, ch1) 13 times, join (20sc)
- ch1, turn, (sc in ch1 sp, ch1) around, join (20sc)
- Repeat previous row 2 times.
- ch1, turn, (sc in ch1 sp, ch1) 6 times, sc in sc, ch1, (sc in ch1 sp, ch1) 14 times, join, (21sc)
- ch1, turn, (sc in ch1 sp, ch1) around, join (21sc)
- Repeat previous row 1 time.
- Separate for thumb – ch1, turn, (sc in ch1 sp, ch1) 13 times, ch 2 more (total of 3 ch sts here), sk next 5 ch spaces, (sc in ch1 sp, ch1) three times, join (16 sc)
- ch1, turn, (sc in ch1 sp, ch1) three times, (sc, ch1) in 1st ch of ch3 space, and again in 2nd ch of ch3 space, continue working (sc in ch1 sp, ch1) around, join (17sc)
- ch1, turn (sc in ch1 sp, ch1) around, join (17sc)
- Repeat previous row 7 times, or until you reach your desired length for the fingers. Tie off.
- Join yarn to thumb – looking at the seam side of the glove, you’ll join to the same ch1 space that the last sc of the finger section used before the ch3 and work toward the outside of the thumb, sc 2 ch1 spaces together, ch1, (sc in ch1 sp, ch1) 3 times, sc 2 ch1 spaces together (the 2nd sp will be the same one used by the sc of the finger section), sc 3 sp together over thumb ch, ch1, join (If you prefer, you can just work 6sc evenly spaced around the thumb. The decreases are intended to help prevent gaps If the thumb is too tight for you, use one fewer decrease, for a total of 7sc around the thumb). (6sc)
- ch1, turn, (sc in ch1 sp, ch1) around, join (6sc)
- Repeat previous row 2 times or until you reach your desired length for the thumb. Tie off, weave in ends.
Glove 2
- ch1, turn, (sc in ch1 sp, ch1) 4 times, sc in sc, ch1, (sc in ch1 sp, ch1) 13 times, join (18sc)
- ch1, turn, (sc in ch1 sp, ch1) around, join (18sc)
- ch1, turn, (sc in ch1 sp, ch1) 5 times, sc in sc, ch1, (sc in ch1 sp, ch1) 13 times, join (19sc)
- ch1, turn, (sc in ch1 sp, ch1) around, join (19sc)
- Repeat previous row 1 time.
- ch1, turn (sc in ch1 sp, ch1) 13 times, sc in sc, ch1, (sc in ch1 sp, ch1) 6 times, join (20sc)
- ch1, turn, (sc in ch1 sp, ch1) around, join (20sc)
- Repeat previous row 2 times.
- ch1, turn, (sc in ch1 sp, ch1) 14 times, sc in sc, ch1, (sc in ch1 sp, ch1) 6 times, join, (21sc)
- ch1, turn, (sc in ch1 sp, ch1) around, join (21sc)
- Repeat previous row 1 time.
- Separate for thumb – ch1, turn, (sc in ch1 sp, ch1) 3 times, ch 2 more (total of 3 ch sts here), sk next 5 ch spaces, (sc in ch1 sp, ch1) 13 times, join (16 sc)
- ch1, turn, (sc in ch1 sp, ch1) 13 times, (sc, ch1) in 1st ch of ch3 space, and again in 2nd ch of ch3 space, continue working (sc in ch1 sp, ch1) around, join (17sc)
- ch1, turn (sc in ch1 sp, ch1) around, join (17sc)
- Repeat previous row 7 times, or until you reach your desired length for the fingers. Tie off.
- Join yarn to thumb – looking at the side opposite the seam side of the glove, you’ll join to the same ch1 space that the last sc of the finger section used before the ch3, sc 2 ch1 spaces together, ch1, (sc in ch1 sp, ch1) 3 times, sc 2 ch1 spaces together (the 2nd sp will be the same one used by the sc of the finger section), sc 3 sp together over thumb ch, ch1, join (If you prefer, you can just work 6sc evenly spaced around the thumb. The decreases are intended to help prevent gaps. If the thumb is too tight for you, use one fewer decrease, for a total of 7sc around the thumb). (6sc)
- ch1, turn, (sc in ch1 sp, ch1) around, join (6sc)
- Repeat previous row 2 times or until you reach your desired length for the thumb. Tie off, weave in ends.
Flaps (Make 2)
- ch34, join, ch1 (doesn’t count), (sc, ch1, sk1) around, join (17sc)
- ch1, turn (sc in ch1 sp, ch1) around, join (17sc)
- Repeat previous row 14 times
- ch1, turn, sc 2 ch spaces together, ch1, sc, ch1, *sc 2 ch spaces together, ch1, (sc, ch1) twice, repeat from * around (12sc)
- ch1, turn (sc in ch1 sp, ch1) around, join (12sc)
- ch1, turn, (sc 2 ch spaces together, ch1, sc, ch1) around 8sc)
- ch1, turn, (sc in ch1 sp, ch1) around, join (8sc)
- ch1, turn, (sc 2 ch spaces together, ch1) around, join (4sc)
- ss 1st and last sc together, ch4, ss remaining two sc together. Tie off, weave in ends.
- Sew one flap onto each glove 2-3 rows below the finger end of the glove. Be sure to sew through only one side of the flap opening so that it can be pulled over the fingers! Sew a button onto the glove at the junction of the ribbing and the glove body. Weave in ends.
![]()
Women’s Large/Men’s Small
Cuff/Setup (Both Gloves)
- ch16, ss in 2nd st from hook and across (15sts)
- ch1, turn, BLO ss across (15sts)
- Repeat row 2 until you have 53 total rows of ss. Join to starting chain with ss’s (or you may sew together). Your join row counts as the 54th row of ss ribbing.
- Ch1, working along the edge of the cuff, think of every 2nd ss row as 1 st (this works out to each ridge in the ribbing counting as one ss)… (sc, ch1, sc2tog, ch1), repeat around, join to starting sc. You should have 18 sc separated by ch1 spaces.
- ch1, turn, (sc in ch1 sp, ch1) around, join (18sc)
- Repeat previous row 3 times. (18sc)
Glove 1
- ch1, turn, (sc in ch1 sp, ch1) 14 times, sc in sc, ch1, (sc in ch1 sp, ch1) 4 times, join (19sc)
- ch1, turn, (sc in ch1 sp, ch1) around, join (19sc)
- ch1, turn, (sc in ch1 sp, ch1) 14 times, sc in sc, ch1, (sc in ch1 sp, ch1) 5 times, join (20sc)
- ch1, turn, (sc in ch1 sp, ch1) around, join (20sc)
- Repeat previous row 1 time.
- ch1, turn (sc in ch1 sp, ch1) 6 times, sc in sc, ch1, (sc in ch1 sp, ch1) 14 times, join (21sc)
- ch1, turn, (sc in ch1 sp, ch1) around, join (21sc)
- Repeat previous row 2 times.
- ch1, turn, (sc in ch1 sp, ch1) 6 times, sc in sc, ch1, (sc in ch1 sp, ch1) 15 times, join, (22sc)
- ch1, turn, (sc in ch1 sp, ch1) around, join (22sc)
- Repeat previous row 3 times.
- Separate for thumb – ch1, turn, (sc in ch1 sp, ch1) 14 times, ch 2 more (total of 3 ch sts here), sk next 5 ch spaces, (sc in ch1 sp, ch1) three times, join (17 sc)
- ch1, turn, (sc in ch1 sp, ch1) three times, (sc, ch1) in 1st ch of ch3 space, and again in 2nd ch of ch3 space, continue working (sc in ch1 sp, ch1) around, join (18sc)
- ch1, turn (sc in ch1 sp, ch1) around, join (18sc)
- Repeat previous row 10 times, or until you reach your desired length for the fingers. Tie off.
- Join yarn to thumb – looking at the seam side of the glove, you’ll join to the same ch1 space that the last sc of the finger section used before the ch3, sc 2 ch1 spaces together, ch1, (sc in ch1 sp, ch1) 3 times, sc 2 ch1 spaces together (the 2nd sp will be the same one used by the sc of the finger section), working over ch at thumb separation, sc 2 sp together, ch1, sc, ch1, join (If you prefer, you can just work 7sc evenly spaced around the thumb. The decreases are intended to help prevent gaps. If the thumb is too tight for you, use one or two fewer decrease, for a total of 8-9sc around the thumb). (7sc)
- ch1, turn, (sc in ch1 sp, ch1) around, join (7sc)
- Repeat previous row 2 times or until you reach your desired length for the thumb. Tie off, weave in ends.
Glove 2
- ch1, turn, (sc in ch1 sp, ch1) 4 times, sc in sc, ch1, (sc in ch1 sp, ch1) 14 times, join (19sc)
- ch1, turn, (sc in ch1 sp, ch1) around, join (19sc)
- ch1, turn, (sc in ch1 sp, ch1) 5 times, sc in sc, ch1, (sc in ch1 sp, ch1) 14 times, join (20sc)
- ch1, turn, (sc in ch1 sp, ch1) around, join (20sc)
- Repeat previous row 1 time.
- ch1, turn (sc in ch1 sp, ch1) 14 times, sc in sc, ch1, (sc in ch1 sp, ch1) 6 times, join (21sc)
- ch1, turn, (sc in ch1 sp, ch1) around, join (21sc)
- Repeat previous row 2 times.
- ch1, turn, (sc in ch1 sp, ch1) 15 times, sc in sc, ch1, (sc in ch1 sp, ch1) 6 times, join, (22sc)
- ch1, turn, (sc in ch1 sp, ch1) around, join (22sc)
- Repeat previous row 3 time.
- Separate for thumb – ch1, turn, (sc in ch1 sp, ch1) 3 times, ch 2 more (total of 3 ch sts here), sk next 5 ch spaces, (sc in ch1 sp, ch1) 14 times, join (17 sc)
- ch1, turn, (sc in ch1 sp, ch1) 14 times, (sc, ch1) in 1st ch of ch3 space, and again in 2nd ch of ch3 space, continue working (sc in ch1 sp, ch1) around, join (18sc)
- ch1, turn (sc in ch1 sp, ch1) around, join (18sc)
- Repeat previous row 10 times, or until you reach your desired length for the fingers. Tie off.
- Join yarn to thumb – looking at the side opposite the seam side of the glove, you’ll join to the same ch1 space that the last sc of the finger section used before the ch3, sc 2 ch1 spaces together, ch1, (sc in ch1 sp, ch1) 3 times, sc 2 ch1 spaces together (the 2nd sp will be the same one used by the sc of the finger section), working over ch at thumb separation, sc 2 sp together, ch1, sc, ch1, join (If you prefer, you can just work 7sc evenly spaced around the thumb. The decreases are intended to help prevent gaps. If the thumb is too tight for you, use one or two fewer decrease, for a total of 8-9sc around the thumb). (7sc)
- ch1, turn, (sc in ch1 sp, ch1) around, join (7sc)
- Repeat previous row 2 times or until you reach your desired length for the thumb. Tie off, weave in ends.
Flaps (Make 2)
- ch36, join, ch1 (doesn’t count), (sc, ch1, sk1) around, join (18sc)
- ch1, turn (sc in ch1 sp, ch1) around, join (18sc)
- Repeat previous row 16 times
- ch1, turn, *sc 2 ch spaces together, ch1, (sc, ch1) 7 times, repeat from * once (16sc)
- ch1, turn, *sc 2 ch spaces together, ch1, (sc, ch1) twice, repeat from * around (12sc)
- ch1, turn (sc in ch1 sp, ch1) around, join (12sc)
- ch1, turn, (sc 2 ch spaces together, ch1, sc, ch1) around (8sc)
- ch1, turn, (sc in ch1 sp, ch1) around, join (8sc)
- ch1, turn, (sc 2 ch spaces together, ch1) around, join (4sc)
- ss 1st and last sc together, ch4, ss remaining two sc together. Tie off, weave in ends.
- Sew one flap onto each glove 2-3 rows below the finger end of the glove. Be sure to sew through only one side of the flap opening so that it can be pulled over the fingers! Sew a button onto the glove at the junction of the ribbing and the glove body. Weave in ends.
![]()
Men’s Medium
Cuff/Setup (Both Gloves)
- ch16, ss in 2nd st from hook and across (15sts)
- ch1, turn, BLO ss across (15sts)
- Repeat row 2 until you have 56 total rows of ss. Join to starting chain with ss’s (or you may sew together). Your join row counts as the 57th row of ss ribbing.
- Ch1, working along the edge of the cuff, think of every 2nd ss row as 1 st (this works out to each ridge in the ribbing counting as one ss)… (sc, ch1, sc2tog, ch1), repeat around, join to starting sc. You should have 19 sc separated by ch1 spaces.
- ch1, turn, (sc in ch1 sp, ch1) around, join (19sc)
- Repeat previous row 3 time. (19sc)
Glove 1
- ch1, turn, (sc in ch1 sp, ch1) 14 times, sc in sc, ch1, (sc in ch1 sp, ch1) 5 times, join (20sc)
- ch1, turn, (sc in ch1 sp, ch1) around, join (20sc)
- ch1, turn, (sc in ch1 sp, ch1) 14 times, sc in sc, ch1, (sc in ch1 sp, ch1) 6 times, join (21sc)
- ch1, turn, (sc in ch1 sp, ch1) around, join (21sc)
- Repeat previous row 3 time.
- ch1, turn (sc in ch1 sp, ch1) 7 times, sc in sc, ch1, (sc in ch1 sp, ch1) 14 times, join (22sc)
- ch1, turn, (sc in ch1 sp, ch1) around, join (22sc)
- Repeat previous row 2 times.
- ch1, turn, (sc in ch1 sp, ch1) 7 times, sc in sc, ch1, (sc in ch1 sp, ch1) 15 times, join, (23sc)
- ch1, turn, (sc in ch1 sp, ch1) around, join (23sc)
- Repeat previous row 3 time.
- Separate for thumb – ch1, turn, (sc in ch1 sp, ch1) 14 times, ch 2 more (total of 3 ch sts here), sk next 5 ch spaces, (sc in ch1 sp, ch1) 4 times, join (18 sc)
- ch1, turn, (sc in ch1 sp, ch1) 4 times, (sc, ch1) in 1st ch of ch3 space, and again in 2nd ch of ch3 space, continue working (sc in ch1 sp, ch1) around, join (19sc)
- ch1, turn (sc in ch1 sp, ch1) around, join (19sc)
- Repeat previous row 10 times, or until you reach your desired length for the fingers. Tie off.
- Join yarn to thumb – looking at the seam side of the glove, you’ll join to the same ch1 space that the last sc of the finger section used before the ch3, (sc in ch1 sp, ch1) 7 times (the last sp will be the same one used by the sc of the finger section), sc 3 sp together over thumb ch, ch1, join (If you prefer, you can just work 8sc evenly spaced around the thumb. The decrease is intended to help prevent gaps. If the thumb is too tight for you, you can work more sc over the ch3 join section). (8sc)
- ch1, turn, (sc in ch1 sp, ch1) around, join (8sc)
- Repeat previous row 3 times or until you reach your desired length for the thumb. Tie off, weave in ends.
Glove 2
- ch1, turn, (sc in ch1 sp, ch1) 5 times, sc in sc, ch1, (sc in ch1 sp, ch1) 14 times, join (20sc)
- ch1, turn, (sc in ch1 sp, ch1) around, join (20sc)
- ch1, turn, (sc in ch1 sp, ch1) 6 times, sc in sc, ch1, (sc in ch1 sp, ch1) 14 times, join (21sc)
- ch1, turn, (sc in ch1 sp, ch1) around, join (21sc)
- Repeat previous row 3 time.
- ch1, turn (sc in ch1 sp, ch1) 14 times, sc in sc, ch1, (sc in ch1 sp, ch1) 7 times, join (22sc)
- ch1, turn, (sc in ch1 sp, ch1) around, join (22sc)
- Repeat previous row 2 times.
- ch1, turn, (sc in ch1 sp, ch1) 15 times, sc in sc, ch1, (sc in ch1 sp, ch1) 7 times, join, (23sc)
- ch1, turn, (sc in ch1 sp, ch1) around, join (23sc)
- Repeat previous row 3 time.
- Separate for thumb – ch1, turn, (sc in ch1 sp, ch1) 4 times, ch 2 more (total of 3 ch sts here), sk next 5 ch spaces, (sc in ch1 sp, ch1) 14 times, join (18 sc)
- ch1, turn, (sc in ch1 sp, ch1) 14 times, (sc, ch1) in 1st ch of ch3 space, and again in 2nd ch of ch3 space, continue working (sc in ch1 sp, ch1) around, join (19sc)
- ch1, turn (sc in ch1 sp, ch1) around, join (19sc)
- Repeat previous row 10 times, or until you reach your desired length for the fingers. Tie off.
- Join yarn to thumb – looking at the side opposite the seam side of the glove, you’ll join to the same ch1 space that the last sc of the finger section used before the ch3, (sc in ch1 sp, ch1) 7 times (the last sp will be the same one used by the sc of the finger section), sc 3 sp together over thumb ch, ch1, join (If you prefer, you can just work 8sc evenly spaced around the thumb. The decrease is intended to help prevent gaps. If the thumb is too tight for you, you can work more sc over the ch3 join section). (8sc)
- ch1, turn, (sc in ch1 sp, ch1) around, join (8sc)
- Repeat previous row 3 times or until you reach your desired length for the thumb. Tie off, weave in ends.
Flaps (Make 2)
- ch38, join, ch1 (doesn’t count), (sc, ch1, sk1) around, join (19sc)
- ch1, turn (sc in ch1 sp, ch1) around, join (19sc)
- Repeat previous row 16 times
- ch1, turn, sc, ch1, *sc 2 ch spaces together, ch1, (sc, ch1) 4 times, repeat from * twice (16sc)
- ch1, turn, *sc 2 ch spaces together, ch1, (sc, ch1) twice, repeat from * around (12sc)
- ch1, turn (sc in ch1 sp, ch1) around, join (12sc)
- ch1, turn, (sc 2 ch spaces together, ch1, sc, ch1) around (8sc)
- ch1, turn, (sc in ch1 sp, ch1) around, join (8sc)
- ch1, turn, (sc 2 ch spaces together, ch1) around, join (4sc)
- ss 1st and last sc together, ch4, ss remaining two sc together. Tie off, weave in ends.
- Sew one flap onto each glove 2-3 rows below the finger end of the glove. Be sure to sew through only one side of the flap opening so that it can be pulled over the fingers! Sew a button onto the glove at the junction of the ribbing and the glove body. Weave in ends.
![]()
Men’s Large
Cuff/Setup (Both Gloves)
- ch16, ss in 2nd st from hook and across (15sts)
- ch1, turn, BLO ss across (15sts)
- Repeat row 2 until you have 59 total rows of ss. Join to starting chain with ss’s (or you may sew together). Your join row counts as the 60th row of ss ribbing.
- Ch1, working along the edge of the cuff, think of every 2nd ss row as 1 st (this works out to each ridge in the ribbing counting as one ss)… (sc, ch1, sc2tog, ch1), repeat around, join to starting sc. You should have 20 sc separated by ch1 spaces.
- ch1, turn, (sc in ch1 sp, ch1) around, join (20sc)
- Repeat previous row 3 time. (20sc)
Glove 1
- ch1, turn, (sc in ch1 sp, ch1) 15 times, sc in sc, ch1, (sc in ch1 sp, ch1) 5 times, join (21sc)
- ch1, turn, (sc in ch1 sp, ch1) around, join (21sc)
- ch1, turn, (sc in ch1 sp, ch1) 15 times, sc in sc, ch1, (sc in ch1 sp, ch1) 6 times, join (22sc)
- ch1, turn, (sc in ch1 sp, ch1) around, join (22sc)
- Repeat previous row 3 time.
- ch1, turn (sc in ch1 sp, ch1) 7 times, sc in sc, ch1, (sc in ch1 sp, ch1) 15 times, join (23sc)
- ch1, turn, (sc in ch1 sp, ch1) around, join (23sc)
- Repeat previous row 4 times.
- ch1, turn, (sc in ch1 sp, ch1) 7 times, sc in sc, ch1, (sc in ch1 sp, ch1) 16 times, join, (24sc)
- ch1, turn, (sc in ch1 sp, ch1) around, join (24sc)
- Repeat previous row 3 time.
- Separate for thumb – ch1, turn, (sc in ch1 sp, ch1) 15 times, ch 2 more (total of 3 ch sts here), sk next 5 ch spaces, (sc in ch1 sp, ch1) 4 time, join (19 sc)
- ch1, turn, (sc in ch1 sp, ch1) 4 times, (sc, ch1) in 1st ch of ch3 space, and again in 2nd ch of ch3 space, continue working (sc in ch1 sp, ch1) around, join (20sc)
- ch1, turn (sc in ch1 sp, ch1) around, join (20sc)
- Repeat previous row 10 times, or until you reach your desired length for the fingers. Tie off.
- Join yarn to thumb – looking at the seam side of the glove, you’ll join to the same ch1 space that the last sc of the finger section used before the ch3, (sc in ch1 sp, ch1) 7 times (the last sp will be the same one used by the sc of the finger section), sc 3 sp together over thumb ch, ch1, join (If you prefer, you can just work 8sc evenly spaced around the thumb. The decrease is intended to help prevent gaps. If the thumb is too tight for you, you can work more sc over the ch3 join section). (8sc)
- ch1, turn, (sc in ch1 sp, ch1) around, join (8sc)
- Repeat previous row 3 times or until you reach your desired length for the thumb. Tie off, weave in ends.
Glove 2
- ch1, turn, (sc in ch1 sp, ch1) 5 times, sc in sc, ch1, (sc in ch1 sp, ch1) 15 times, join (21sc)
- ch1, turn, (sc in ch1 sp, ch1) around, join (21sc)
- ch1, turn, (sc in ch1 sp, ch1) 6 times, sc in sc, ch1, (sc in ch1 sp, ch1) 15 times, join (22sc)
- ch1, turn, (sc in ch1 sp, ch1) around, join (22sc)
- Repeat previous row 3 times.
- ch1, turn (sc in ch1 sp, ch1) 15 times, sc in sc, ch1, (sc in ch1 sp, ch1) 7 times, join (23sc)
- ch1, turn, (sc in ch1 sp, ch1) around, join (23sc)
- Repeat previous row 4 times.
- ch1, turn, (sc in ch1 sp, ch1) 16 times, sc in sc, ch1, (sc in ch1 sp, ch1) 7 times, join, (24sc)
- ch1, turn, (sc in ch1 sp, ch1) around, join (24sc)
- Repeat previous row 3 times.
- Separate for thumb – ch1, turn, (sc in ch1 sp, ch1) 4 times, ch 2 more (total of 3 ch sts here), sk next 5 ch spaces, (sc in ch1 sp, ch1) 15 times, join (19 sc)
- ch1, turn, (sc in ch1 sp, ch1) 15 times, (sc, ch1) in 1st ch of ch3 space, and again in 2nd ch of ch3 space, continue working (sc in ch1 sp, ch1) around, join (20sc)
- ch1, turn (sc in ch1 sp, ch1) around, join (20sc)
- Repeat previous row 10 times, or until you reach your desired length for the fingers. Tie off.
- Join yarn to thumb – looking at the side opposite the seam side of the glove, you’ll join to the same ch1 space that the last sc of the finger section used before the ch3, (sc in ch1 sp, ch1) 7 times (the last sp will be the same one used by the sc of the finger section), sc 3 sp together over thumb ch, ch1, join (If you prefer, you can just work 8sc evenly spaced around the thumb. The decrease is intended to help prevent gaps. If the thumb is too tight for you, you can work more sc over the ch3 join section). (8sc)
- ch1, turn, (sc in ch1 sp, ch1) around, join (8sc)
- Repeat previous row 3 times or until you reach your desired length for the thumb. Tie off, weave in ends.
Flaps (Make 2)
- ch40, join, ch1 (doesn’t count), (sc, ch1, sk1) around, join (20sc)
- ch1, turn (sc in ch1 sp, ch1) around, join (20sc)
- Repeat previous row 17 times
- ch1, turn, *sc 2 ch spaces together, ch1, (sc, ch1) 3 times, repeat from * around (16sc)
- ch1, turn, *sc 2 ch spaces together, ch1, (sc, ch1) twice, repeat from * around (12sc)
- ch1, turn (sc in ch1 sp, ch1) around, join (12sc)
- ch1, turn, (sc 2 ch spaces together, ch1, sc, ch1) around (8sc)
- ch1, turn, (sc in ch1 sp, ch1) around, join (8sc)
- ch1, turn, (sc 2 ch spaces together, ch1) around, join (4sc)
- ss 1st and last sc together, ch4, ss remaining two sc together. Tie off, weave in ends.
- Sew one flap onto each glove 2-3 rows below the finger end of the glove. Be sure to sew through only one side of the flap opening so that it can be pulled over the fingers! Sew a button onto the glove at the junction of the ribbing and the glove body. Weave in ends.
If you like this pattern, you may also like the Stella Fingerless Gloves, the Men’s Thermal Fingerless gloves, or the Moss Stitch Mug Rug!
This pattern and all associated images are copyrighted. If you would like to use this pattern in a roundup blog post, you may use 1 image and link to this blog post. You may not copy the pattern instructions. Thank you for supporting Kickin Crochet!
Your timing is perfect! I have several family members (guys & gals) that live up north that this would make excellent Christmas gifts for, THANK YOU SOOO MUCH! I’m excited to get started (crocheting is very relaxing for me) after all this cooking stress for Thanksgiving. Again, Thank you this is a true blessing. Bless you and yours!
Make sure you put the exclamation point after the code
Hello Mary,
Lovely pattern
Ravelry says the code is not valid
Tried several times & copy/paste would not work either.
Thanks for the help.
The code is not working, I tried yesterday and gave it a try today, just can’t get it to work can you email me a code for your glove patten. They are beautiful and would love you make them. Thank you for sharing then with us