
The Star Wash Cloth is a free crochet pattern – and it comes with a video tutorial! I wanted something festive for the holiday season, and a star seemed just the thing. I had to fiddle around a bit to get the chart looking good, but I’m pretty happy with the final result!
*Disclosure: Some of the links in this post are affiliate links, which means if you click on them and make a purchase I may, at no additional cost to you, earn a commission. Read full disclosure here.
This blog post includes the written instructions, a .jpg of the star chart, and the video tutorial (the video tutorial shows the first 26 rows – after that, it’s smooth sailing!). You can also purchase an ad-free PDF copy of this pattern from Ravelry or Etsy using the buttons below.
Supplies
- WeCrochet Dishie worsted cotton yarn in Ash, Silver, and Pomegranate (1 ball each), or other worsted cotton yarn like Bernat Handicrafter Cotton or Lily Sugar & Cream
- Size H crochet hook – I love these Odyssey hooks from Furls Crochet!
- optional – some bobby pins and stitch markers if you’d like to try the trick I show in the video!
- Yarn/Tapestry Needle
Gauge/Sizing
Gauge is not important for this project, but my gauge is 10 rows and 8 sts in 2″, with a finished size of approximately 8″ tall by 10″ wide.
Stitch Abbreviations
- ch chain
- st(s) stitch(es)
- fsc foundation single crochet
- sc single crochet
Pattern Notes
This project uses colorwork techniques. You can watch the YouTube video I made showing how to complete this project below. In the video, I show each row up through row 26, at which point there is just the top spire of the star remaining, which is relatively simple!
To prepare for your project, you will first need to wind separate balls of yarn. You will need the following (each ball will have a few extra yards left over when the project is complete):
- Silver – 2 balls of 10 yards and 1 ball of 5 yards
- Ash – 2 balls of 10 yards and 1 ball of 5 yards
- Pomegranate – 1 ball of 10 yards, 2 balls of 45 yards (or, to prevent needing to wind 45 yards of yarn, you can just use 2 full balls for each of the 45 yard balls. You will still need to wind a separate 10 yard ball.
In the video, I show a simple trick I used to manage all the little balls – when I wound them, I wound them onto bobby pins. Then, when I am using that ball, I attach it to the bottom of my project so that when I turn the project, the balls of yarn don’t get tangled!
For all color changes, complete the color change by finishing the last step of the previous stitch with the new color. For simplicity, I will call the Pomegranate color “red” and Ash “gray”. On the chart, white squares are Silver, gray squares are Ash, and red squares are Pomegranate.
Important – Read This!
I have adopted a few conventions to simplify the reading of each row. All stitches used are single crochets. Because the type of stitch never changes, instead of writing “sc 2”, I will simply write 2. When a color change comes, I will simply state the name of the new color so that you don’t have to read “switch to x color” over and over again – so instead of “sc 10, switch to gray, sc 2, switch to silver, sc 2”, it will read “10, gray 2, silver 2”.
If a color change occurs more than 1 square after the color change on the previous row, work over the yarn of the other color until you arrive at the color change. Or, if the color change is more than 1 square before the color change on the previous row, work over the length of your of your new color needed to reach the new color change – make sure to not pull too tight, as this can cause your project to ‘pucker’ and not lie flat (see video if you have questions on this). This prevents yarn strands from being visible on the front or back of the work.
Star Wash Cloth Video Tutorial
How to Make The Star Wash Cloth
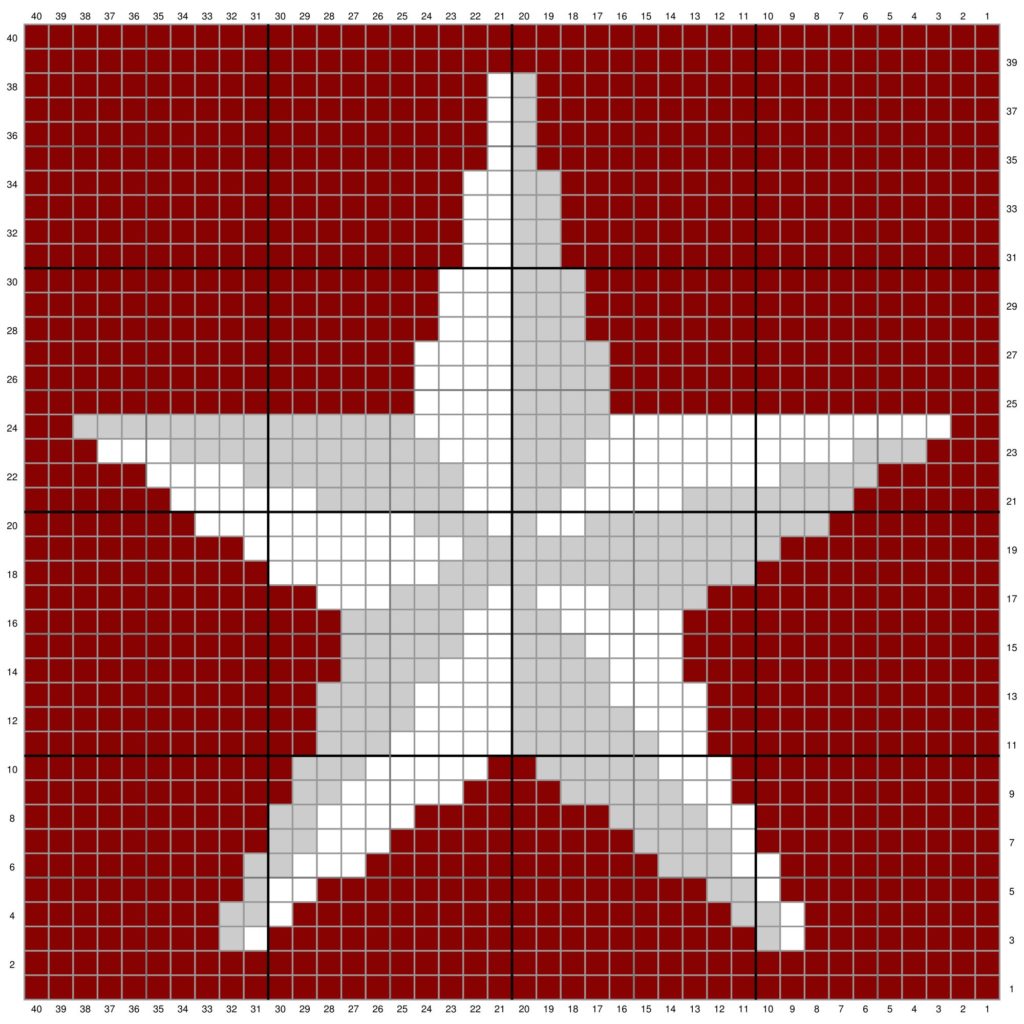
You can use the chart above, or follow the written directions below (or, of course, a combination of the two).
- 1. with red, fsc 40 -or- ch41, sc in 2nd ch from hook and across (40sc – stitch count remains the same throughout the pattern)
- 2. ch1 (does not count as first st now and throughout), turn, sc across
- 3. ch1, turn, 8, silver 1, gray 1 (use larger gray ball), red 20 (use small red ball), silver 1, gray 1 (use other larger gray ball), red 8 (use second large red ball)
- 4. ch1, turn, 8, gray 2, silver 1, red 18, gray 2, silver 1, red 8
- 5. ch1, turn, 9, silver 1, gray 2, red 16, silver 2, gray 1, red 9
- 6. ch1, turn, 9, gray 2, silver 3, red 12, gray 3, silver 2, red 9
- 7. ch1, turn, 10, silver 1, gray 4, red 10, silver 3, gray 2, red 10
- 8. ch1, turn, 10, gray 2, silver 4, red 8, gray 4, silver 2, red 10
- 9. ch1, turn, 11, silver 2, gray 5, red 4, silver 5, gray 2, red 11
- 10. ch1, turn, 11, gray 3, silver 5, red 2, gray 5, silver 3, red 11
- 11. ch1, turn, 12, silver 2, gray 6, silver 5, gray 3, red 12 (you may detach the center red ball at this point – leave a tail to weave in your end)
- 12. ch1, turn, 12, gray 4, silver 4, gray 5, silver 3, red 12
- 13. ch1, turn, 12, silver 4, gray 4, silver 4, gray 4, red 12
- 14. ch1, turn, gray 4, silver 3, gray 4, silver 3, red 13
- 15. ch1, turn, 13, silver 4, gray 3, silver 2, gray 5, red 13
- 16. ch1, turn, 13, gray 5, silver 2, gray 2, silver 5, red 13
- 17. ch1, turn, 12, gray 4 (attach new ball of gray here), silver 3, gray 1, silver 1, gray 4, silver 3, red 12
- 18. ch1, turn, 10, silver 7, gray 3, switch to next gray ball, 1, switch to third gray ball, 9, red 10 (note – even though it is a continuous line of gray, you switch which gray ball you are using on parts of this row and the next row so that the 1st and 2nd ball stay lined up and ready to go into the other points of the star)
- 19. ch1, turn, 9, gray 10, switch to 2nd gray ball, 1, switch to last gray ball, 2, silver 9, red 9
- 20. ch1, turn, 7, silver 9, gray 3, silver 1 (attach new ball here), gray 1, silver 2 (attach other ball here), gray 10, red 7
- 21. ch1, urn, 6, gray 7, silver 5, gray 2, silver 2, gray 6, silver 6, red 6
- 22. ch1, turn, 5, silver, 4, gray 9, silver 2, gray 3, silver 8, gray 4, red 5
- 23. ch1, turn, 3, gray 3, silver 11, gray 3, silver 3, gray 11, silver 3, red 3
- 24. ch1, turn, 2, gray 14, silver 4, gray 4, silver 14, red 2 (at this point, you may remove all the gray and silver balls from your project except for the two center balls that will form the top point of the star)
- 25. ch1, turn, 16, gray 4, silver 4, red 16
- 26. ch1, turn, 16, silver 4, gray 4, red 16
- 27. ch1, turn, 16, gray 4, silver 4, red 16
- 28. ch1, turn, 17, silver 3, gray 3, red 17
- 29. ch1, turn, 17, gray 3, silver 3, red 17
- 30. ch1, turn, 17, silver 3, gray 3, red 17
- 31. ch1, turn, 18, gray 2, silver 2, red 18
- 32. ch1, turn, 18, silver 2, gray 2, red 18
- 33. ch1, turn, 18, gray 2, silver 2, red 18
- 34. ch1, turn, 18, silver 2, gray 2, red 18
- 35. ch1, turn, 19, gray 1, silver 1, red 19
- 36. ch1, turn, 19, silver 1, gray 1, red 19
- 37. ch1, turn, 19, gray 1, silver 1, red 19
- 38. ch1, turn, 19, silver 1, gray 1, red 19
- 39. ch1, turn, sc across with red
- 40. ch1, turn, sc across with red.
- Finish off, weave in all ends. You’re done!
If you like this pattern, you may like the Santa Hat crochet pattern or the Potholder crochet pattern.
This pattern and all associated images are copyrighted. If you would like to use this pattern in a roundup blog post, you may use 1 image and link to this blog post. You may not copy the pattern instructions. Thank you for supporting Kickin Crochet!