
This project has been a labor of love for the past few months, going through several iterations and trials. I’ve taken apart more failed attempts than I care to admit, but I’m really pleased to share this pattern with you! You may know that April is Autism Awareness Month. I wanted to do something for the autistic community, not exactly to raise awareness about autism, but to spread some love to the community. This pattern is free on my blog for anyone who wants it, and I hope that these blankets can spread some cheer to some kids’ days.
*Disclosure: Some of the links in this post are affiliate links, which means if you click on them and make a purchase I may, at no additional cost to you, earn a commission. Read full disclosure here.
I think a lot of us are “aware” enough about autism, and I don’t feel that it’s my place to teach you the details. I’m not an expert, and I’m not autistic, so I’m not the best source. If you’re not sure what autism is, it’s mainly characterized by difficulties with social interactions, but often comes with other traits. If you want to learn more about autism, you can see the diagnostic criteria in the DSM-V (the official guide for psychological diagnosis), or go check out the Autism Society web site. This pattern is free on my blog for anyone who wants it, and I hope that these blankets can spread some cheer to some kids’ days.
About the Design
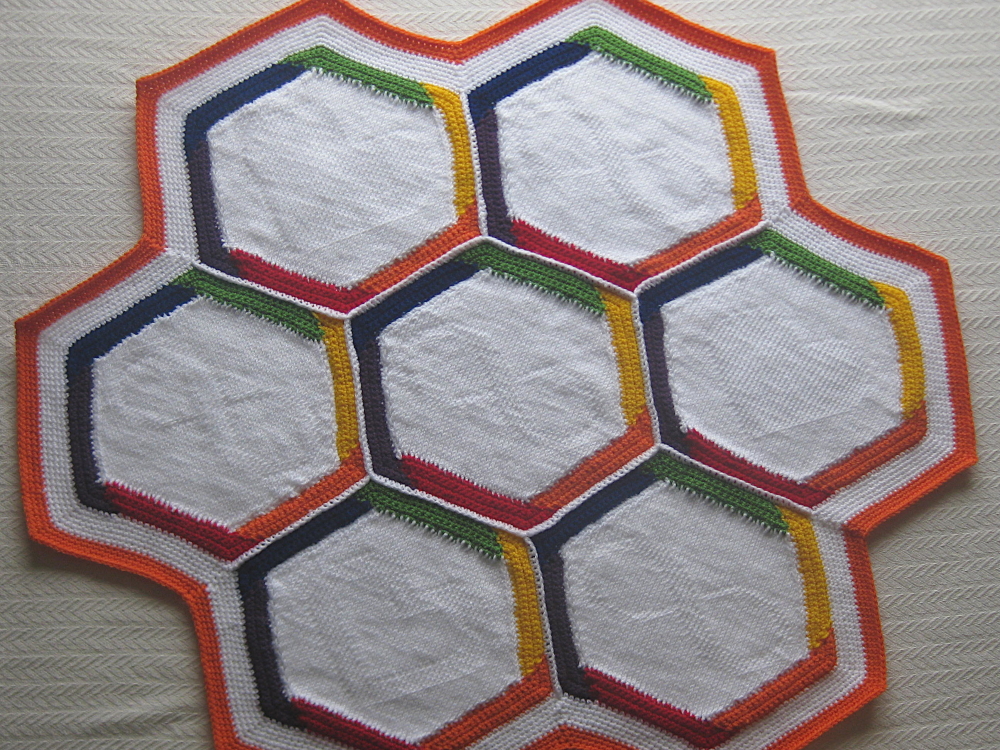
In designing this blanket, I wanted to incorporate some symbolism, I guess you could say, into the design choices. You’ve probably seen the puzzle piece symbol that has come to be the logo for autism. It turns out that a lot of people in the autistic community really don’t like that symbol. (I mean, would you like it if the best someone could do to describe you was “puzzling”?) So I’ve left puzzle pieces off the blanket.
In lieu of the puzzle pieces, I’ve incorporated the infinity symbol, which some groups have started using to represent both neurodiversity and autism, specifically. I’ve also included two different heart pattern styles to go with the infinity symbol. When you make your own, you can, of course, choose how many of each type of square to make.
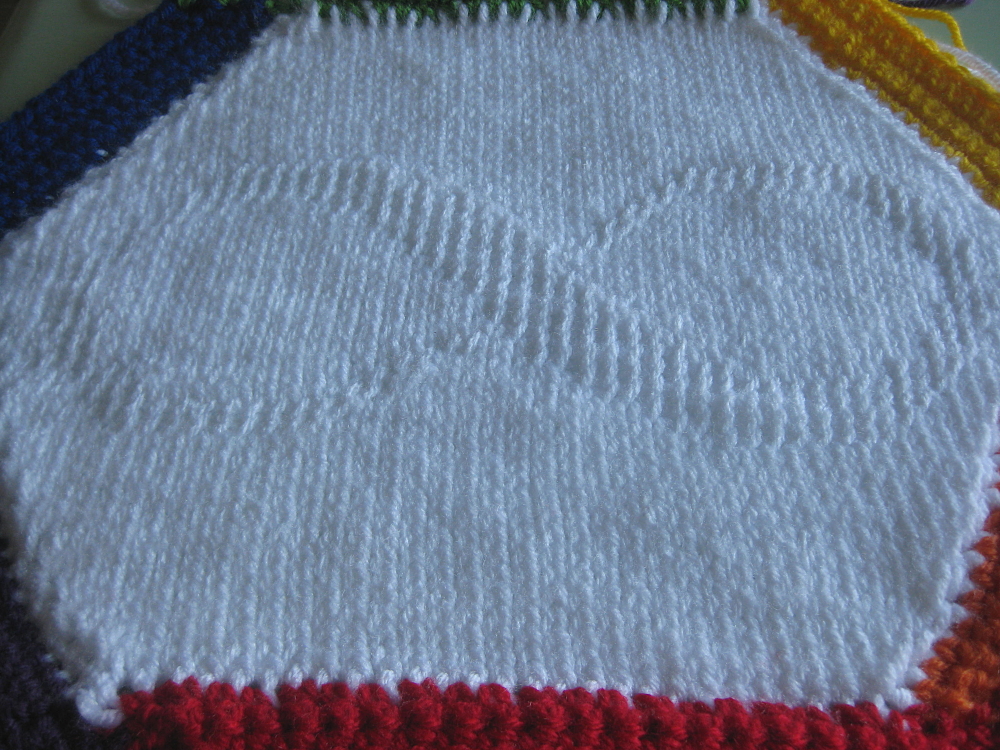
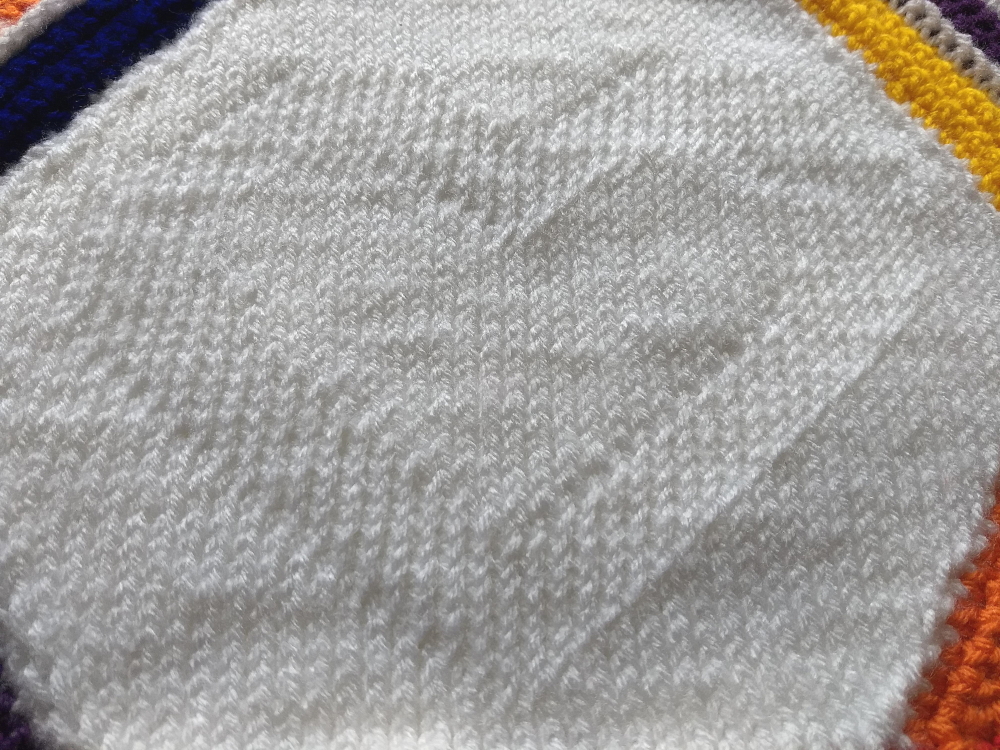

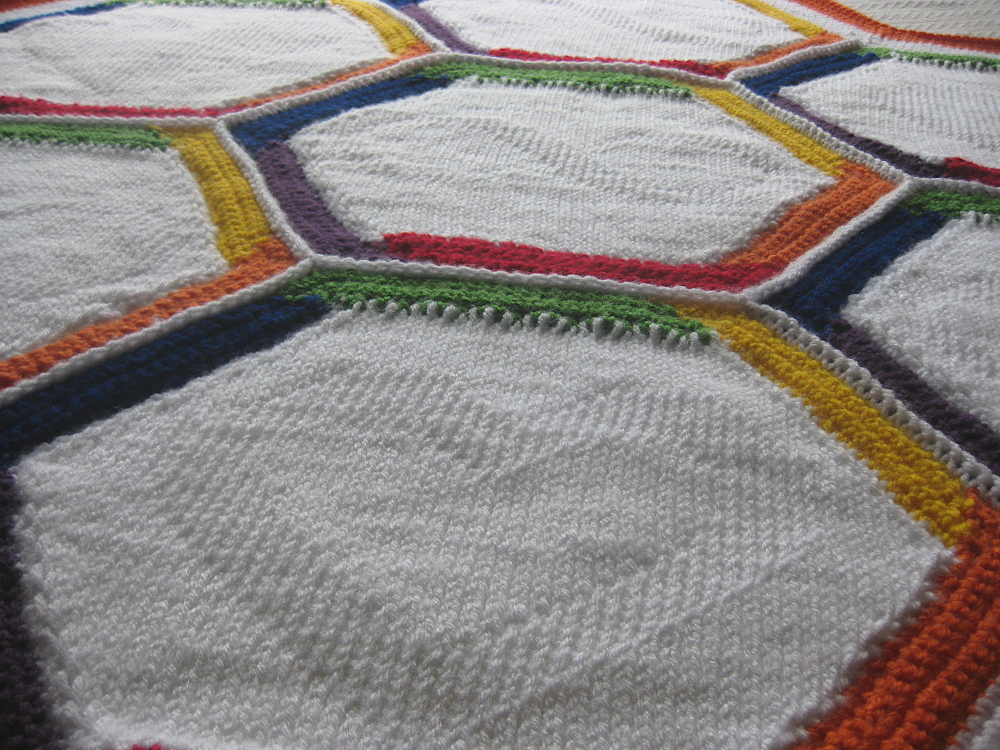
You may be thinking, “Oh, but those designs are so hard to see! Why didn’t you do them with colors?!” I wanted the designs to be subtle for a reason. When you first look at this blanket, you don’t see the designs at all. It looks like just plain white squares. But as you look closer, or look at the right angle with the right lighting, the design becomes clear. Autistic people don’t necessarily “look” autistic or show outward traits that you would notice at first glance. You have to get to know them, and look at them in the right light, to see both their difficulties and their strengths. (Hey, that’s kind of like non-autistic people out there!) The differences are sometimes subtle, but they are real.
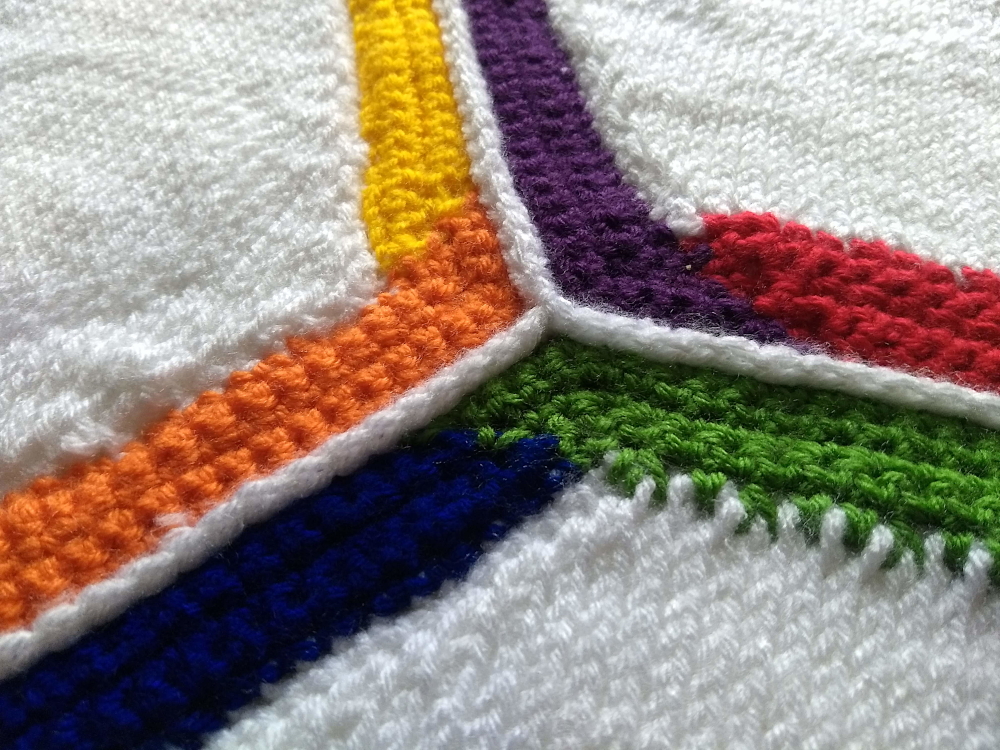
One thing that is very clear to me is that it’s really unfair to lump all autistic people into one category and assume that means they’re all the same. Autistic people have a wide range of skills, interests, abilities, and challenges. I used a rainbow border to around each hex to represent that diversity of people in the autistic community. Their humanity defines them more than their autism. They are individual people with individual personalities, needs, and desires.
Autism Love Crochet Blanket Supplies
For this blanket, I used Knit Picks/We Crochet Brava Worsted yarn. I chose this yarn because it has a really great variety of colors, isn’t very expensive, is washable since it’s acrylic, and has a nice sheen to it. You can get it at We Crochet.
Depending on the size you’d like to make, you may need to purchase more yarn. For the design as I made it, with seven squares, you’ll need:
Brava Worsted in –
- Canary, 1 ball (30g)
- Celestial, 1 ball (30g)
- Mulberry, 1 ball (30g)
- Orange, 1 ball (30g + 60g outer border)
- Peapod, 1 ball (30g)
- Red, 1 ball (30g)
- White, 5 balls
You can use any color you’d like for the outer border, of course. It doesn’t have to be orange. If you would like to make a larger blanket, you will need to add about 5g of each color per square and about 60g of white. So if I wanted to make a blanket with 20 squares, I would get 20×5 = 100g (1 ball) of each color and 20×60 = 1,200g (12 balls) of white.
You would also need more white and orange for the outer border. To calculate this, draw out your layout and count the number of straight sides around the outside edge. For the blanket I made, there are 18 outside edges. Multiply that number times 4.5 for white, so 18×4.5 = 81g (1 ball) for the border above. For the 20 square blanket, it would be 34 outside edges, so 34×4.5 = 153g (2 balls white). For orange, multiply the number by 3, so 34×3=102g (2 balls orange – really, one and a little bit). These are approximate calculations. At $2/ball, you could just buy a few extra and not worry about the math, if you want.
For reference in deciding on your size, each hex measures approximately 14″ wide and 11.5″ tall, and the border adds 4.5″ total width and height to the finished project.
You will also need a size I Tunisian crochet hook. For a blanket with more drape, increase your hook size (you will also need more yarn).
Autism Love Blanket Pattern Instructions and Video
The center of each hex, the white part, is done in tunisian crochet. You’ll need either a tunisian crochet hook/afghan hook or a crochet hook with an extender cable. You can also get these at We Crochet/Knit Picks. Each of the three hexes has a chart that you can use. Download them here. An example is shown below.
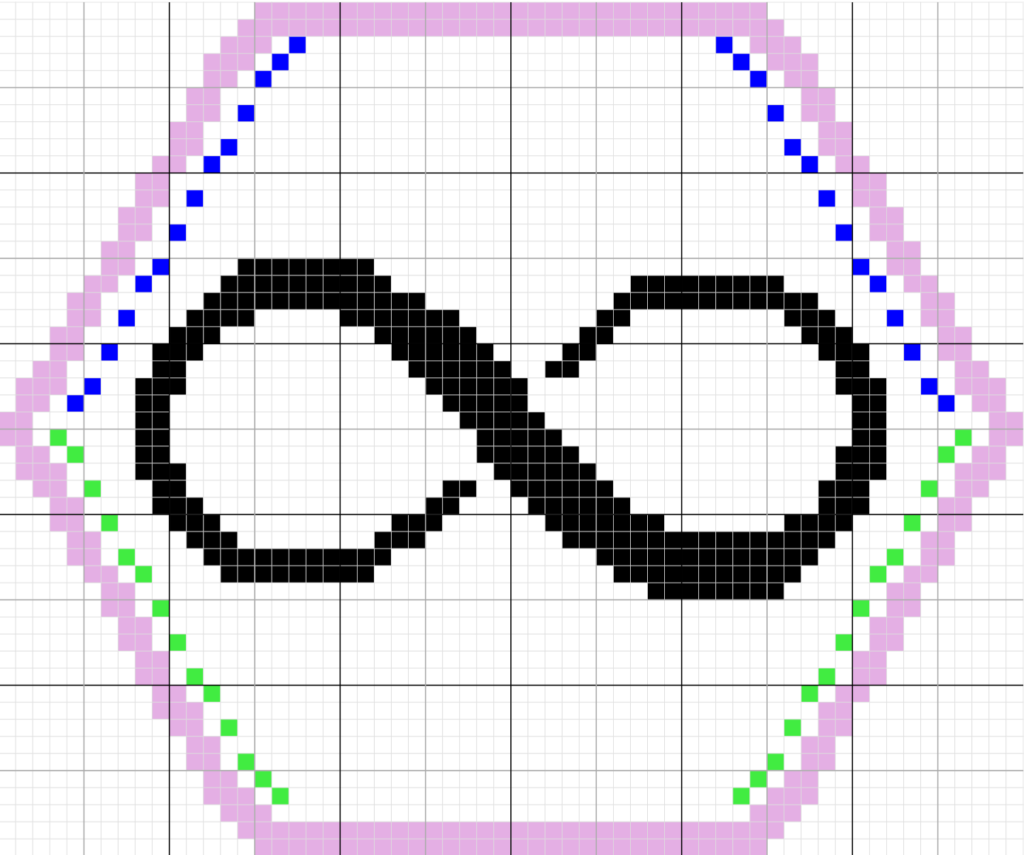
In the stitch charts, the stitches are color coded. The purple outer border does NOT represent a stitch, it just shows the outline of the design.
- White – tks – Tunisian Knit Stitch
- Black – ttks – Tunisian Twisted Knit Stitch
- Green – inc – Tunisian Full Stitch Increase
- Blue – dec – Tunisian Knit Stitch Two Together (decrease)
If you’re a little rusty on tunisian crochet, or completely new to it, not to worry! I filmed a video where you can get a quick refresher on how to do the foundation row for tunisian crochet, how to do the knit stitch, the twisted knit stitch, the increase, and the decrease. I also show you step by step how to make the rainbow border design. If you’re a visual learner, check out the video, below! You can also check out tunisian crochet stitch tutorials in the tutorials section here. For line by line directions for each hex, skip down to the next section.
Stitch Instruction Photos


Starting Chain 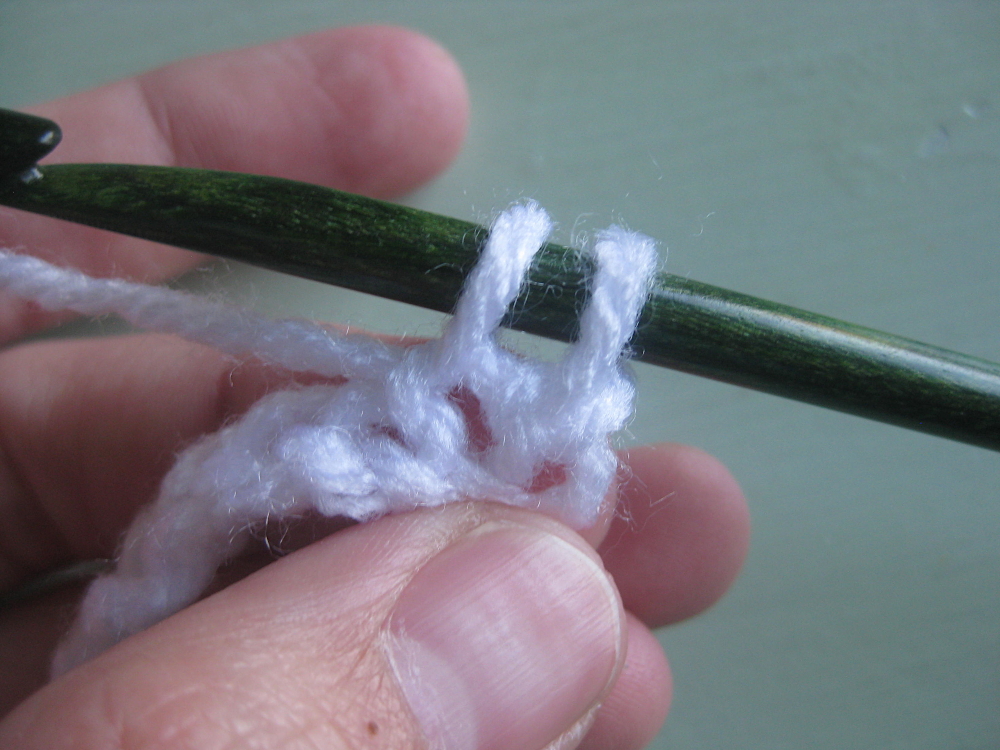

Pull up a loop in each st across 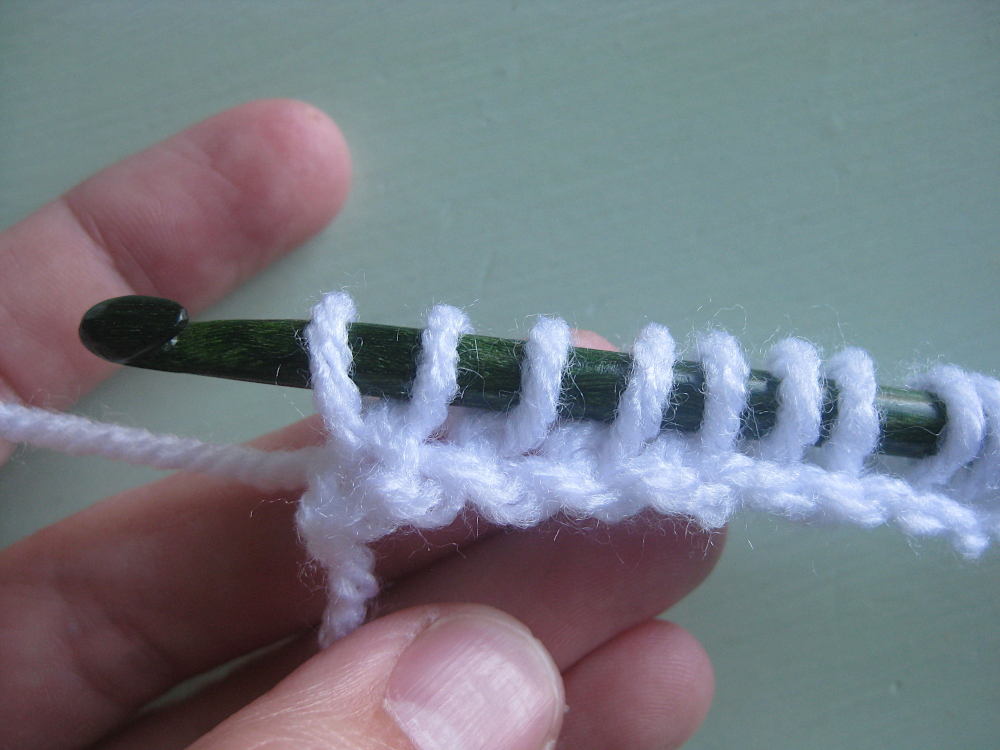
End of the foundation row forward pass 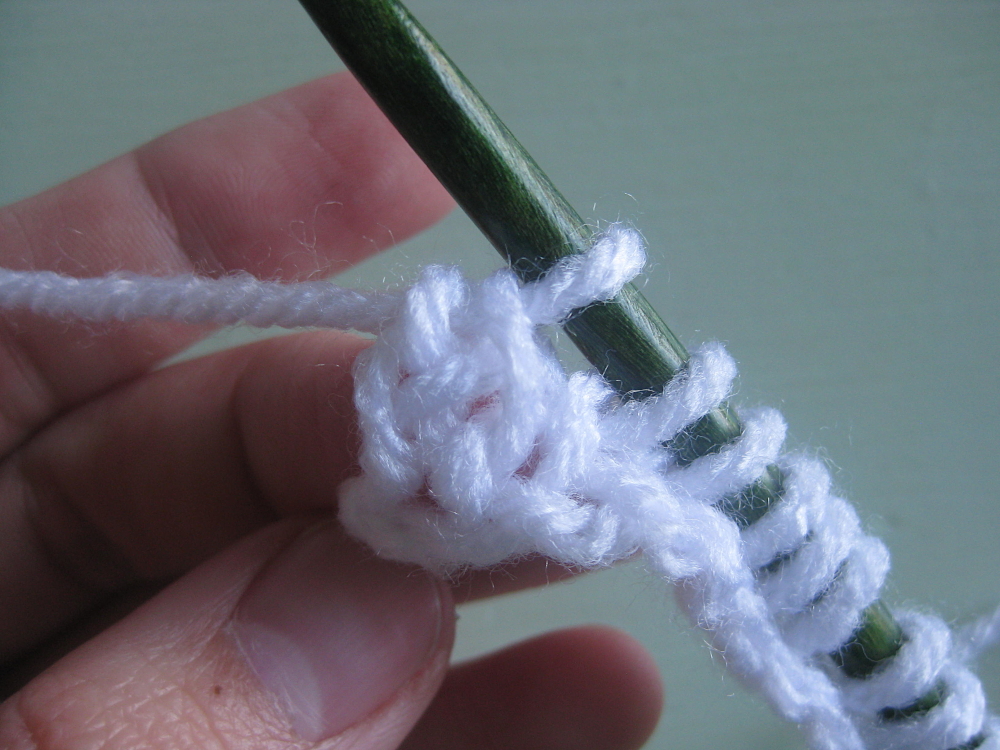
ch1, then yo and pull through two loops on hook 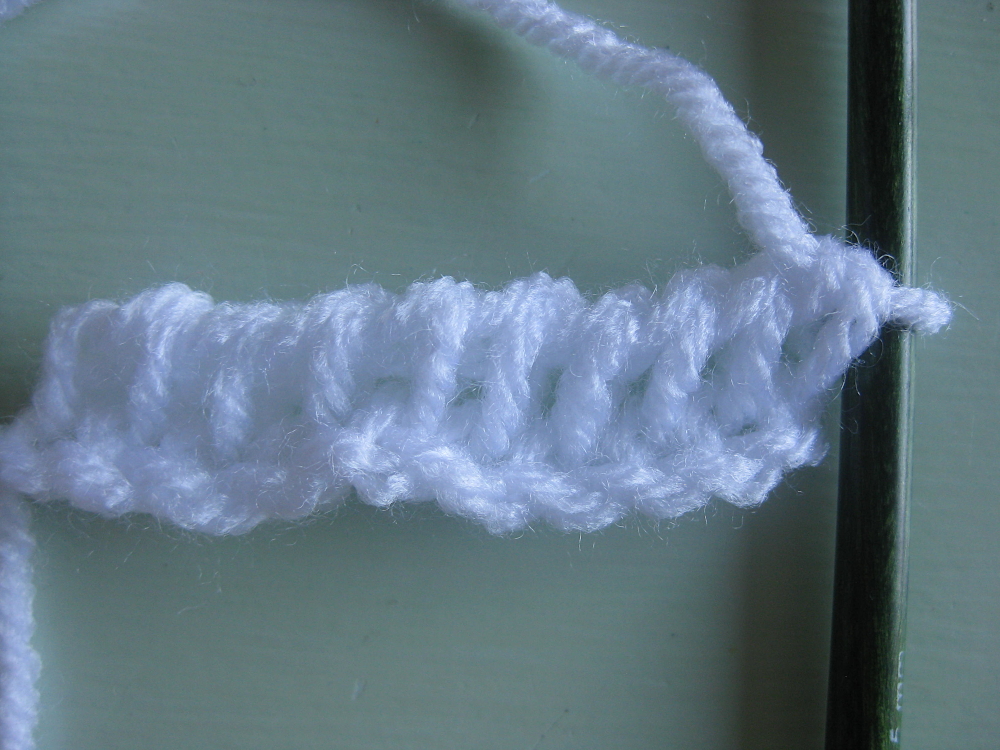
continue across entire return pass 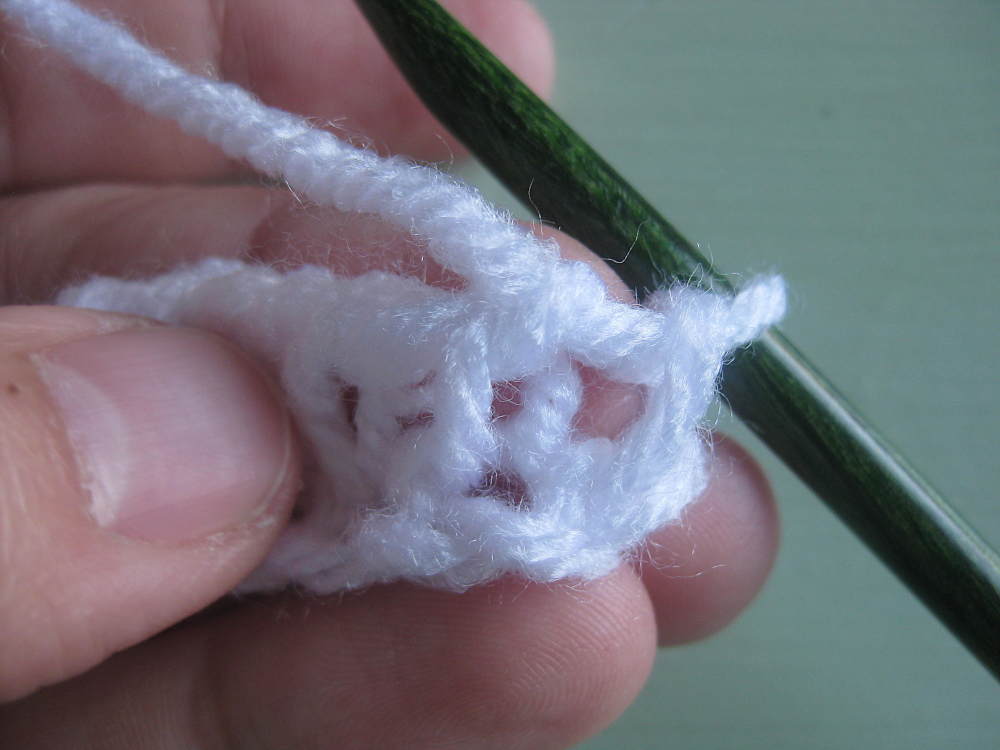
Notice the stitch has a front and back vertical loop 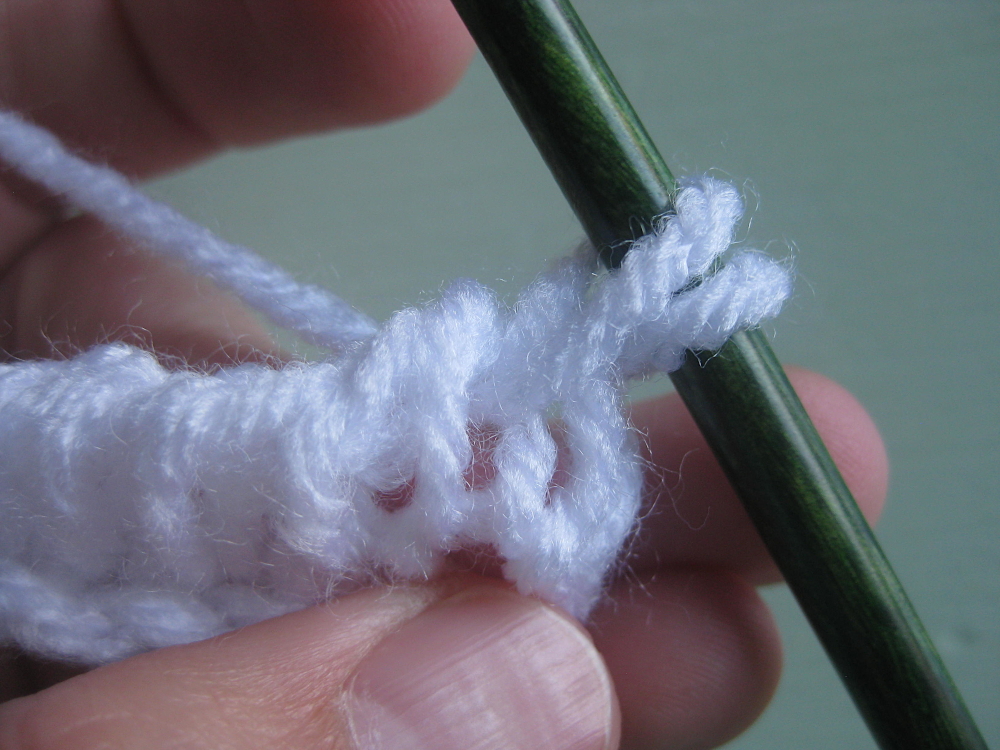
tks – insert hook from front to back between loops, yo and pull a loop through 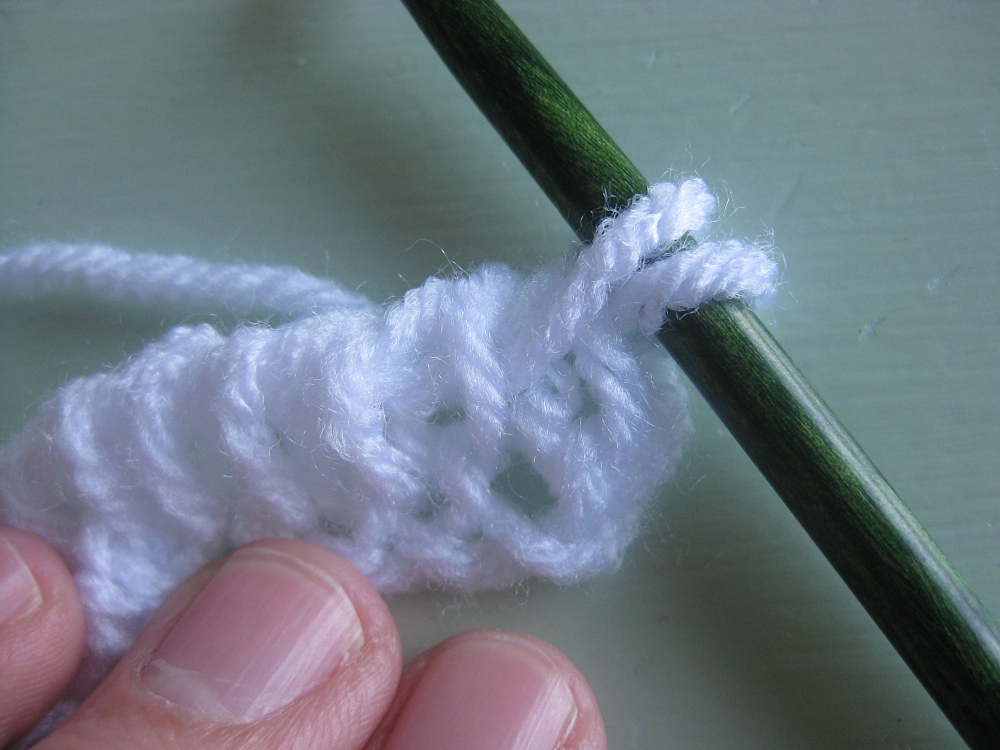
tks 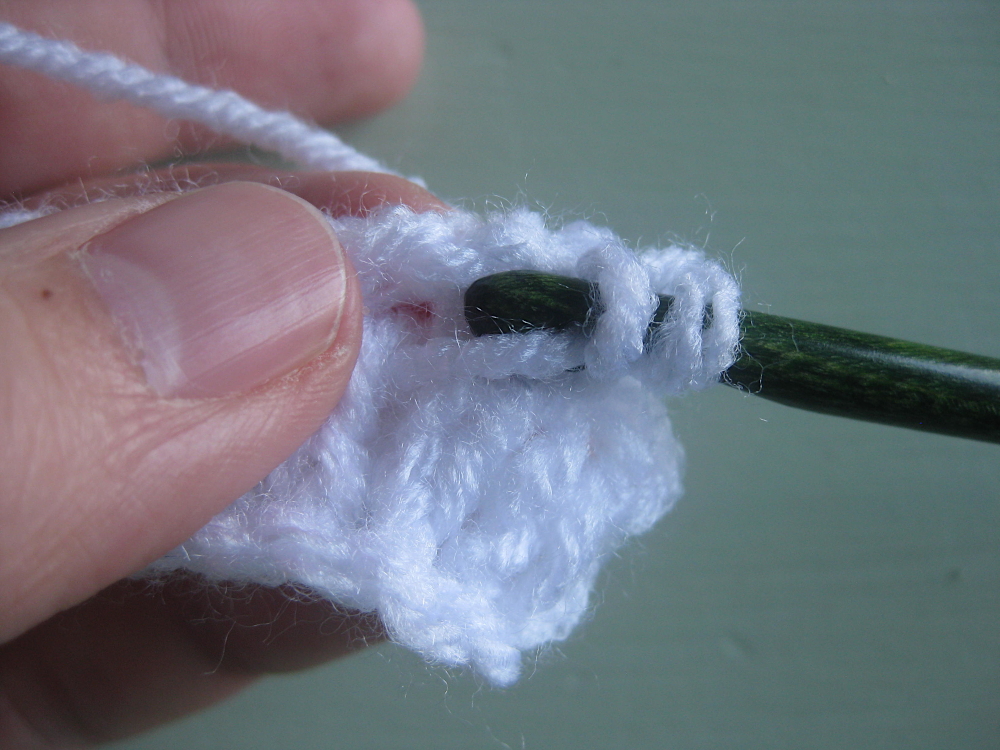
ttks, pull front loop to the right 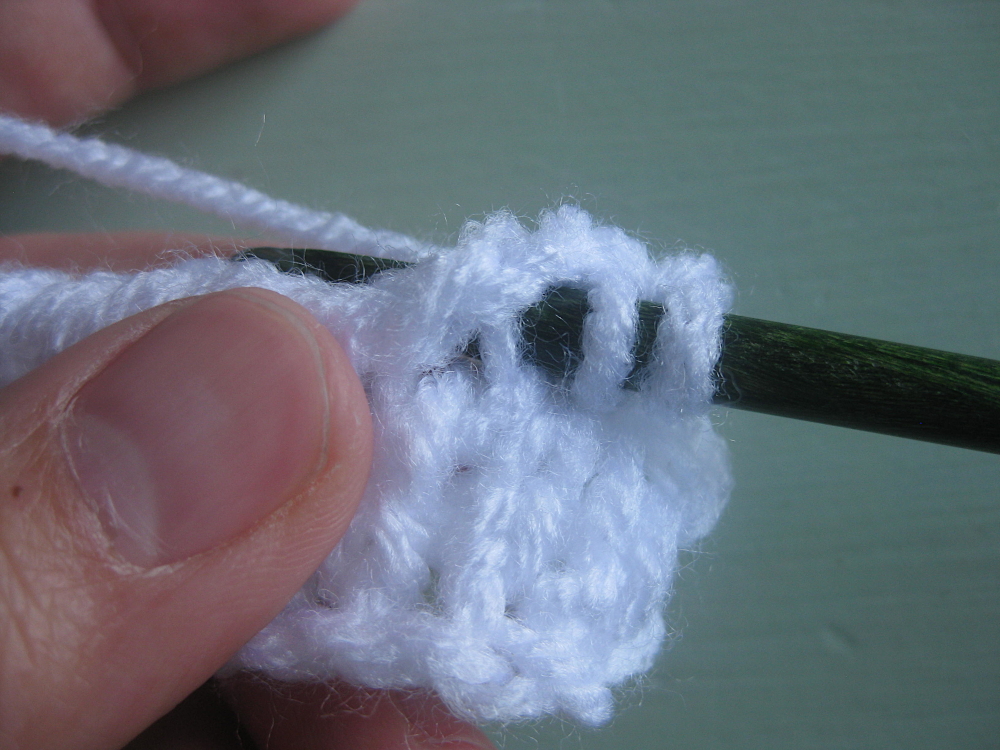
then insert hook front to back, as for tks 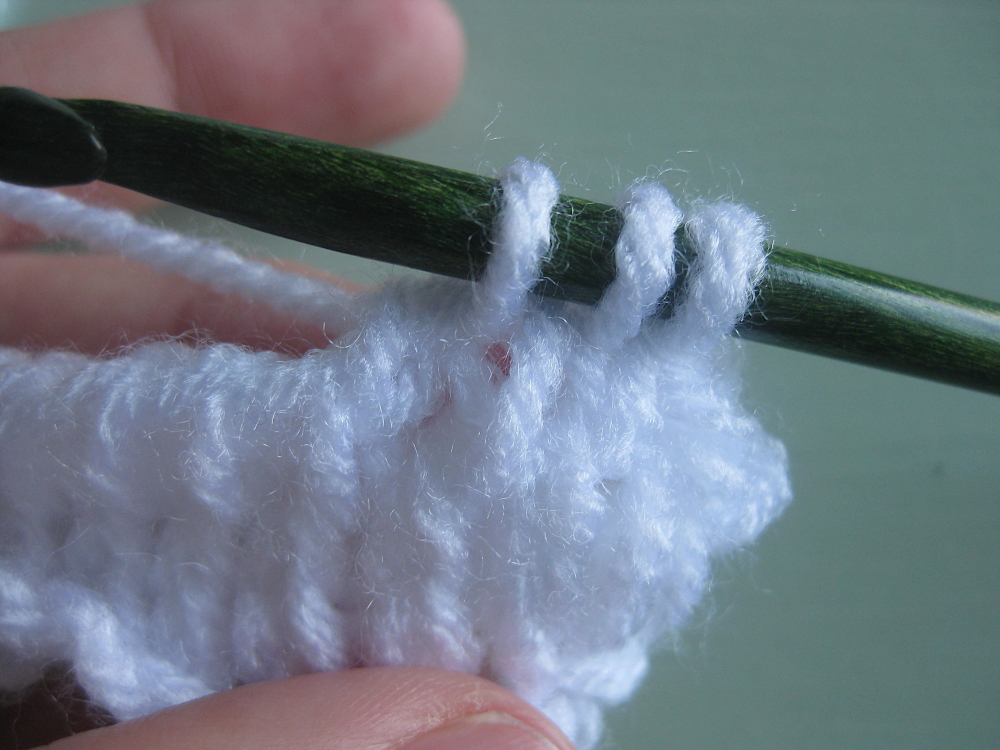
yo and pull through a loop 
dec – insert hook front to back through loops of next two sts 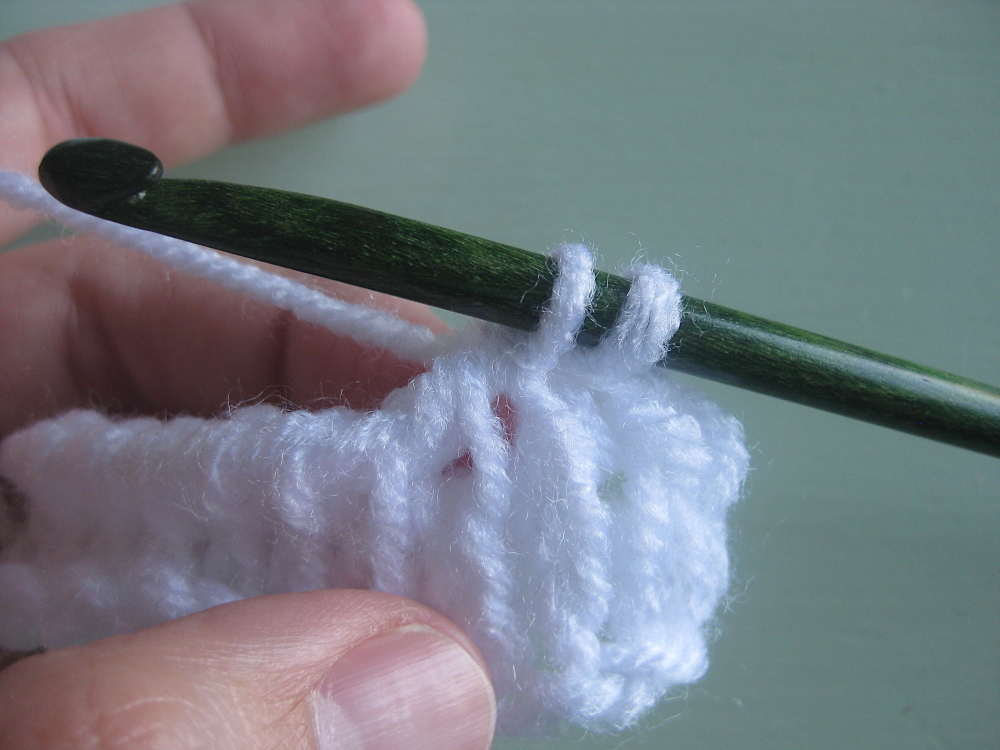
yo and pull through a loop 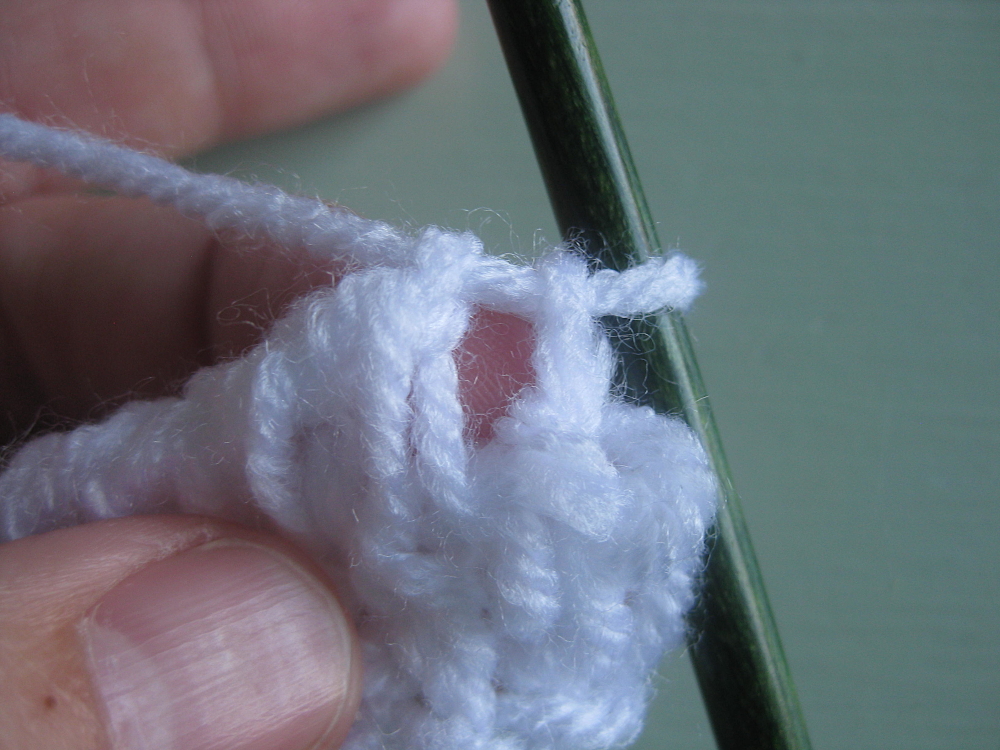
inc – insert hook in space between two sts 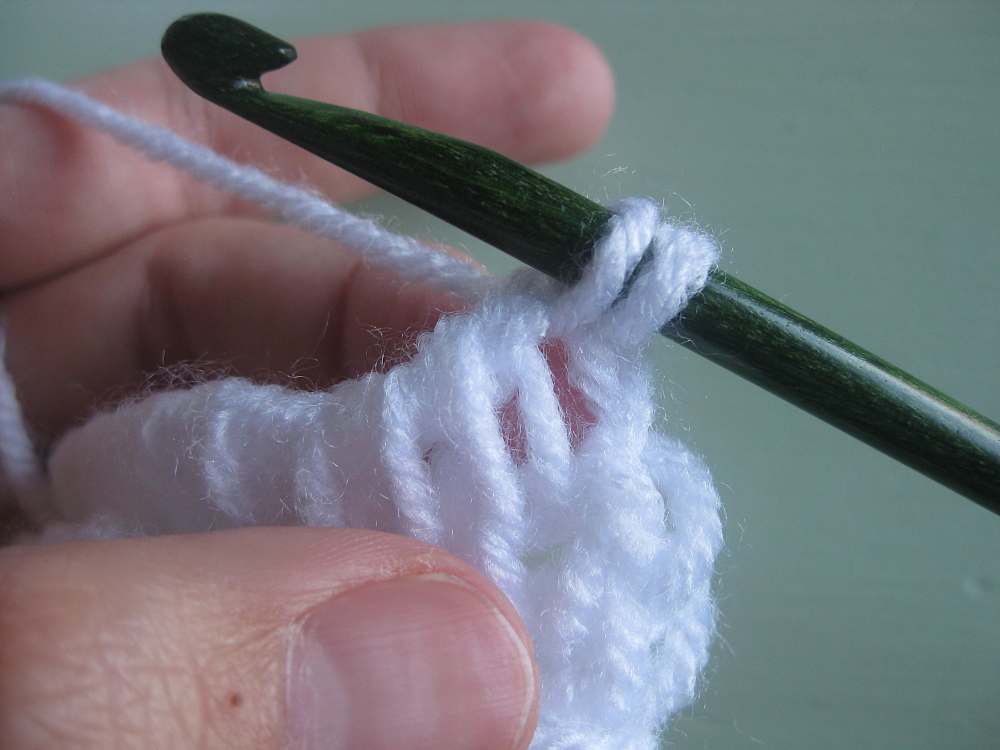
yo and pull up a loop 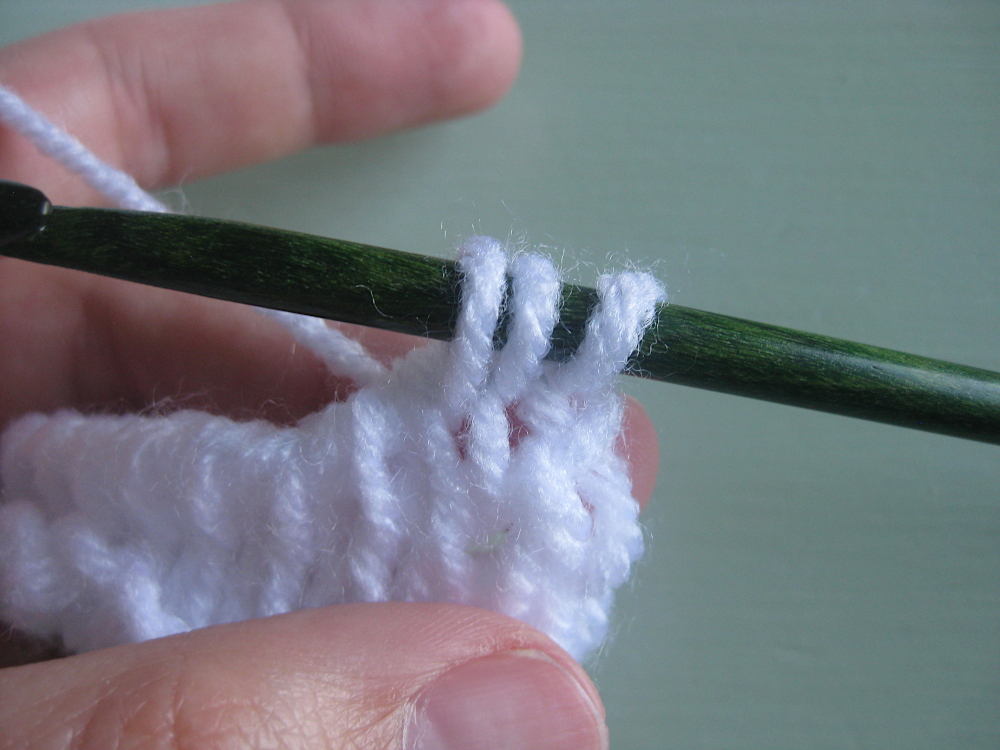
Increase – notice the extra loop between the starting loop and the first tks stitch.
Infinity Loop Blanket Square Instructions
Notes – The loop on your hook at the beginning of your row counts as your first stitch. Also, for every row, the return pass is worked normally, so I am not going to write it out for every row. The return pass is: Ch1, *yo and pull through two loops on hook. Repeat from * across. To check your stitch count, I recommend checking before starting the return pass. It’s much easier to count the number of loops on your hook than it is to count every stitch across a row.
- Foundation row – Ch28, pick up loop in each ch across (28 loops on hook). Ch1, *yo and pull through two loops. Repeat from *across. (28 sts)
- inc, tks 26, inc, tks (30sts)
- inc, tks 28, inc, tks (32sts)
- inc, tks 30, inc, tks (34sts)
- tks 33 (34sts)
- inc, tks 32, inc, tks (36sts)
- tks 35 (36sts)
- inc, tks 34, inc, tks (38sts)
- inc, tks 36, inc, tks (40sts)
- tks 39 (40sts)
- inc, tks 38, inc, tks (42sts)
- tks 41 (42sts)
- inc, tks 40, inc, tks (44sts)
- tks 5, ttks8, tks 30 (44sts)
- inc, tks 4, ttks 11, tks 14, ttks9, tks 4, inc, tks (46sts)
- inc, tks 4, ttks 13, tks 12, ttks 11, tks 4, inc, tks (48sts)
- tks 4, ttks 16, tks 8, ttks 3, tks 8, ttks 3, tks 5 (48sts)
- inc, tks 3, ttks 4, tks, 7, ttks 7, tks 6, ttks 3, tks 10, ttks 3, tks 3, inc, tks (50sts)
- tks 3, ttks 3, tks 11, ttks 6, tks 4, ttks 2, tks 13, ttks 3, tks 4 (50sts)
- inc, tks 3, ttks 3, tks 12, ttks 6, tks 2, ttks 2, tks 15, ttks 2, tks 3, inc, tks (52sts)
- tks 3, ttks 3, tks 14, ttks 6, tks 18, ttks 3, tks 4 (52sts)
- inc, tks 3, ttks 3, tks 15, ttks 6, tks 18, ttks 2, tks 3, inc, tks (54sts)
- inc, tks 4, ttks 2, tks 17, ttks 5, tks 18, ttks 2, tks 4, inc, tks (56sts)
- tks 5, ttks 2, tks 18, ttks 5, tks 17, ttks 2, tks 6 (56sts)
- dec, tks 3, ttks 2, tks 19, ttks 5, tks 16, ttks 2, tks 3, dec, tks (54sts)
- dec, tks 2, ttks 3, tks 18, ttks 6, tks 14, ttks 3, tks 2, dec, tks (52sts)
- tks 4, ttks 2, tks 15, ttks 2, tks 2, ttks 6, tks 13, ttks 2, tks 5 (52sts)
- dec, tks 2, ttks 3, tks 13, ttks 2, tks 4, ttks 6, tks 11, ttks 3, tks 2, dec, tks (50sts)
- tks 4, ttks 3, tks 11, ttks 2, tks 6, ttks 6, tks 9, ttks 3, tks 5 (50sts)
- dec, tks 3, ttks 3, tks 9, ttks 2, tks 8, ttks 7, tks 5, ttks 4, tks 3, dec, tks (48sts)
- tks 5, ttks 12, tks 11, ttks 13, tks 6 (48sts)
- dec, tks 5, ttks 9, tks 14, ttks, 10, tks 4, dec, tks (46sts)
- dec, tks 28, ttks 8, tks 4, dec, tks (44sts)
- tks 43 (44sts)
- dec, tks 38, dec, tks (42sts)
- tks 41 (42sts)
- dec, tks 36, dec, tks (40sts)
- tks 39 (40sts)
- dec, tks 34, dec, tks (38sts)
- dec, tks 32, dec, tks (36sts)
- tks 35 (36sts)
- dec, tks 30, dec, tks (34sts)
- tks 33 (34sts)
- dec, tks 28, dec, tks (32sts)
- dec, tks 26, dec, tks (30sts)
- dec, tks 24, dec, tks (28sts)
Hollow Heart Blanket Square Instructions
Notes – The loop on your hook at the beginning of your row counts as your first stitch. Also, for every row, the return pass is worked normally, so I am not going to write it out for every row. The return pass is: Ch1, *yo and pull through two loops on hook. Repeat from * across. To check your stitch count, I recommend checking before starting the return pass. It’s much easier to count the number of loops on your hook than it is to count every stitch across a row.
- Foundation row – Ch28, pick up loop in each ch across (28 loops on hook). Ch1, *yo and pull through two loops. Repeat from *across. (28 sts)
- inc, tks 26, inc, tks (30sts)
- inc, tks 28, inc, tks (32sts)
- inc, tks 30, inc, tks (34sts)
- tks 15, ttks 2, tks 16 (34sts)
- inc, tks 14, ttks 4, tks 14, inc, tks (36sts)
- tks 14, ttks 6, tks 15 (36sts)
- inc, tks 13, ttks 8, tks 13, inc, tks (38sts)
- inc, tks 13, ttks 10, tks 13, inc, tks (40sts)
- tks 13, ttks 12, tks 14 (40sts)
- inc, tks 12, ttks 14, tks 12, inc, tks (42sts)
- tks 12, ttks 7, tks 2, ttks 7, tks 13 (42sts)
- inc, tks 11, ttks 7, tks 4, ttks 7, tks 11, inc, tks (44sts)
- tks 11, ttks 7, tks 6, ttks 7, tks 12 (44sts)
- inc, tks 10, ttks 7, tks 8, ttks 7, tks 10 inc, tks (46sts)
- inc, tks 10, ttks 7, tks 10, ttks 7, tks 10, inc, tks (48sts)
- tks 10, ttks 7, tks 12, ttks 7, tks 11 (48sts)
- inc, tks 9, ttks 7, tks 14, ttks 7, tks 9, inc, tks (50sts)
- tks 9, ttks 7, tks 16, ttks 7, tks 10 (50sts)
- inc, tks 8, ttks 7, tks 18, ttks 7, tks 8, inc, tks (52sts)
- tks 8, ttks 7, tks 20, ttks 7, tks 9 (52sts)
- inc, tks 7, ttks 7, tks 22, ttks 7, tks 7, inc, tks (54sts)
- inc, tks 8, ttks 7, tks 22, ttks 7, tks 8, inc, tks (56sts)
- tks 8, ttks 7, tks 24, ttks 7, tks 9 (56sts)
- dec, tks 6, ttks 7, tks 24, ttks 7, tks 6, dec, tks (54sts)
- dec, tks 5, ttks 6, tks 26, ttks 6, tks 5, dec, tks (52sts)
- tks 6, ttks 6, tks 26, ttks 6, tks 7 (52sts)
- dec, tks 4, ttks 6, tks 12, ttks 2, tks 12, ttks 6, tks 4, dec, tks (50sts)
- tks 5, ttks 6, tks 11, ttks 4, tks 11, ttks 6, tks 6 (50sts)
- dec, tks 3, ttks 6, tks 10, ttks 6, tks 10, ttks 6, tks 3 dec, tks (48sts)
- tks 5, ttks 6, tks 8, ttks 8, tks 8, ttks 6, tks 6 (48sts)
- dec, tks 3, ttks 7, tks 5, ttks 12, tks 5, ttks 7, tks 3, dec, tks (46sts)
- dec, tks 3, ttks 34, tks 3, dec, tks (44sts)
- tks 5, ttks15, tks 2, ttks 15, tks 6 (44sts)
- dec, tks 4, ttks 13, tks 4, ttks 13, tks 4, dec, tks (42sts)
- tks 6, ttks 11, tks 6, ttks 11, tks 7 (42sts)
- dec, tks 5, ttks 9, tks 8, ttks 9, tks 5, dec, tks (40sts)
- tks 7, ttks 7, tks 10, ttks 7, tks 8 (40sts)
- dec, tks 34, dec, tks (38sts)
- dec, tks 32, dec, tks (36sts)
- tks 35 (36sts)
- dec, tks 30, dec, tks (34sts)
- tks 33 (34sts)
- dec, tks 28, dec, tks (32sts)
- dec, tks 26, dec, tks (30sts)
- dec, tks 24, dec, tks (28sts)
Solid Heart Blanket Square Instructions
Notes – The loop on your hook at the beginning of your row counts as your first stitch. Also, for every row, the return pass is worked normally, so I am not going to write it out for every row. The return pass is: Ch1, *yo and pull through two loops on hook. Repeat from * across. To check your stitch count, I recommend checking before starting the return pass. It’s much easier to count the number of loops on your hook than it is to count every stitch across a row.
- Foundation row – Ch28, pick up loop in each ch across (28 loops on hook). Ch1, *yo and pull through two loops. Repeat from *across. (28 sts)
- inc, tks 26, inc, tks (30sts)
- inc, tks 28, inc, tks (32sts)
- inc, tks 30, inc, tks (34sts)
- tks 33 (34sts)
- inc, tks 32 inc, tks (36sts)
- tks 16, ttks 2, tks 17 (36sts)
- inc, tks 15, ttks 4, tks 15, inc, tks (38sts)
- inc, tks 15, ttks 6, tks 15, inc, tks (40sts)
- tks 15, ttks 8, tks 16 (40sts)
- inc, tks 14, ttks 10, tks 14, inc, tks (42sts)
- tks 14, ttks 12, tks 15 (42sts)
- inc, tks 13, ttks 14, tks 13, inc, tks (44sts)
- tks 13, ttks16, tks 14 (44sts)
- inc, tks 12, ttks 18, tks 12, inc, tks (46sts)
- inc, tks 12, ttks 20, tks 12, inc, tks (48sts)
- tks 12, ttks 22, tks 13 (48sts)
- inc, tks 11, ttks 24, tks 11, inc, tks (50sts)
- tks 11, ttks 26, tks 12 (50sts)
- inc, tks 10, ttks 28, tks 10, inc, tks (52sts)
- tks 10, ttks 30, tks 11 (52sts)
- inc, tks 9, ttks 32, tks 9, inc, tks (54sts)
- inc, tks 10, ttks 32, tks 10, inc, tks (56sts)
- tks 10, ttks 34, tks 11 (56sts)
- dec, tks 8, ttks 34, tks 8, dec, tks (54sts)
- dec, tks 7, ttks 34, tks 7, dec, tks (52sts)
- tks 8, ttks 34, tks 9 (52sts)
- dec, tks 6, ttks 34, tks 6, dec, tks (50sts)
- tks 7, ttks 34, tks 8 (50sts)
- dec, tks 6, ttks 32, tks 6, dec, tks (48sts)
- tks 7, ttks 32, tks 8 (48sts)
- dec, tks 6, ttks 14, tks 2, ttks 14, tks 6, dec, tks (46sts)
- dec, tks 6, ttks 12, tks 4, ttks 12, tks 6, dec, tks (44sts)
- tks 8, ttks 10, tks 6, ttks 10, tks 9 (44sts)
- dec, tks 7, ttks 8, tks 8, ttks 8, tks 7, dec, tks (42sts)
- tks 10, ttks 4, tks 12, ttks 4, tks 11 (42sts)
- dec, tks 36, dec, tks (40sts)
- tks 39 (40sts)
- dec, tks 34, dec, tks (38sts)
- dec, tks 32, dec, tks (36sts)
- tks 35 (36sts)
- dec, tks 30, dec, tks (34sts)
- tks 33 (34sts)
- dec, tks 28, dec, tks (32sts)
- dec, tks 26, dec, tks (30sts)
- dec, tks 24, dec, tks (28sts)
Autism Love Blanket Square Border Instructions
Just as a reminder, if you want a video walk through of how to make this border, check out the video linked above!
Whew! You’re done with the Tunisian portion of the project, and it’s time to add the rainbow border. You’ve probably noticed that your hexagons are rolling up… a lot. The border will help it to lay flat (and blocking will help, too). You can use the same hook. Pick a side to start your border on. It doesn’t really matter what side, just make sure you pick the same side for each hex you do, or some of your designs will be upside down. If you like that look, of course, then go for it! Make it your own.
I decided to start at the bottom of my hex, so I turned my square upside down to start. You’ll have to work decreases along each side, because the tunisian crochet is tighter than a regular single crochet. Also, remember that when you switch color, you should work the last yarn over and pull through with the new color on the last stitch of the previous color. Here we go!
- Join red to st just left of the far right corner. Work sc, sc dec, (2sc, sc dec) five times, sc, dec, 2sc in corner stitch on left. You should have 21 stitches total, including the two in the corner. Switch to orange (do not cut red)
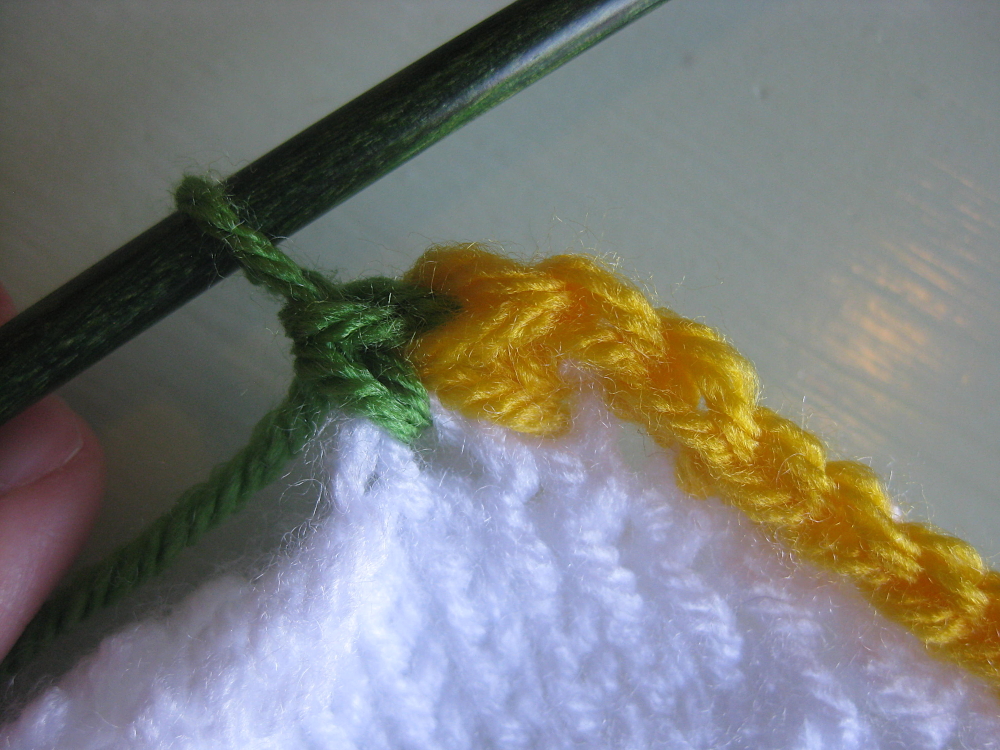
- For the side edges, work sc across, with three decreases approximately equally spaced along the edge. You should also end up with 21 stitches, including two in the corner stitch. Switch to yellow – continue in pattern with green (green will have the same decrease count as for red in the first step, since it’s on the top), blue, then purple, until you’re all the way around.
- Join to first red stitch. Still working with purple, ch1 (doesn’t count as stitch), turn, 3sc in 1st st, 18 sc, sc dec, switch to blue by picking up the yarn left at the end of the first row, 3sc in 1st blue st, 18 sc, sc dec, switch to green – continue around (22 st/color).
- Join red to first purple stitch. Still working in red, ch1 (doesn’t count as stitch), turn, sc dec, sc 17, 2sc, sc, 2sc, switch to orange – continue around (23 st/color).
- Join purple to first red stitch. Still working in purple, ch1 (doesn’t count), turn, 2sc in 1st sc, sc 2, 2sc in next st, sc 17, sc dec, switch to blue – continue around (24 st/color).
- Join to first purple stitch. Still working in red, ch1 (doesn’t count), turn, sc dec, sc 17, 2sc in next st, sc 3, 2sc in next st, switch to orange – continue around (24 st/color).
- Join. Tie off, weave in ends.
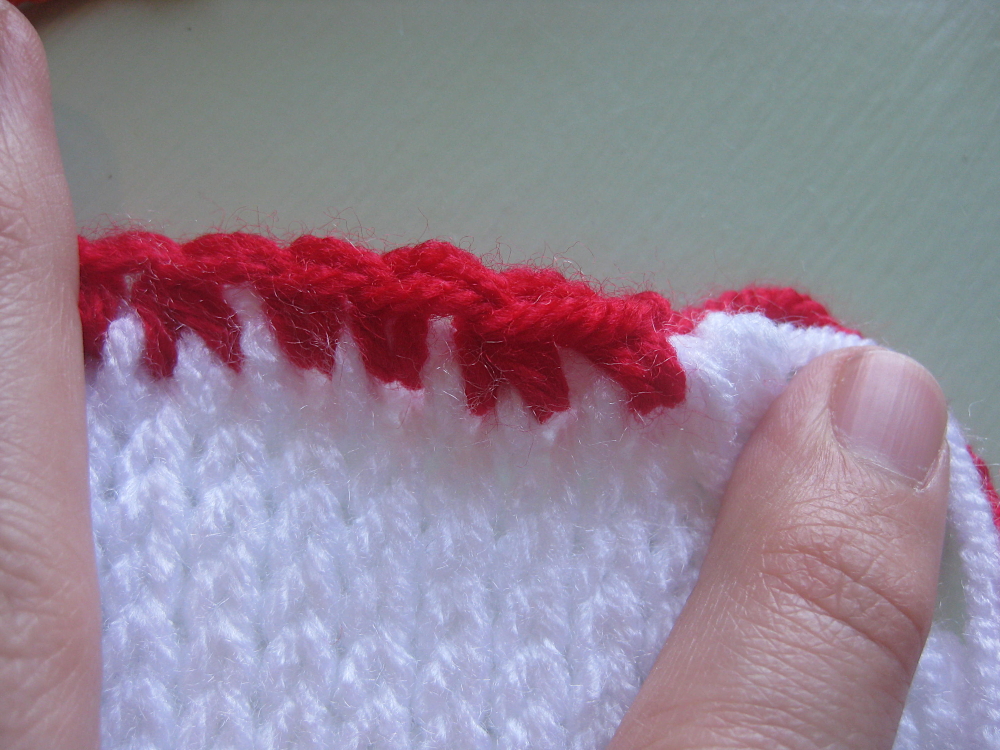
Start at stitch to left of corner 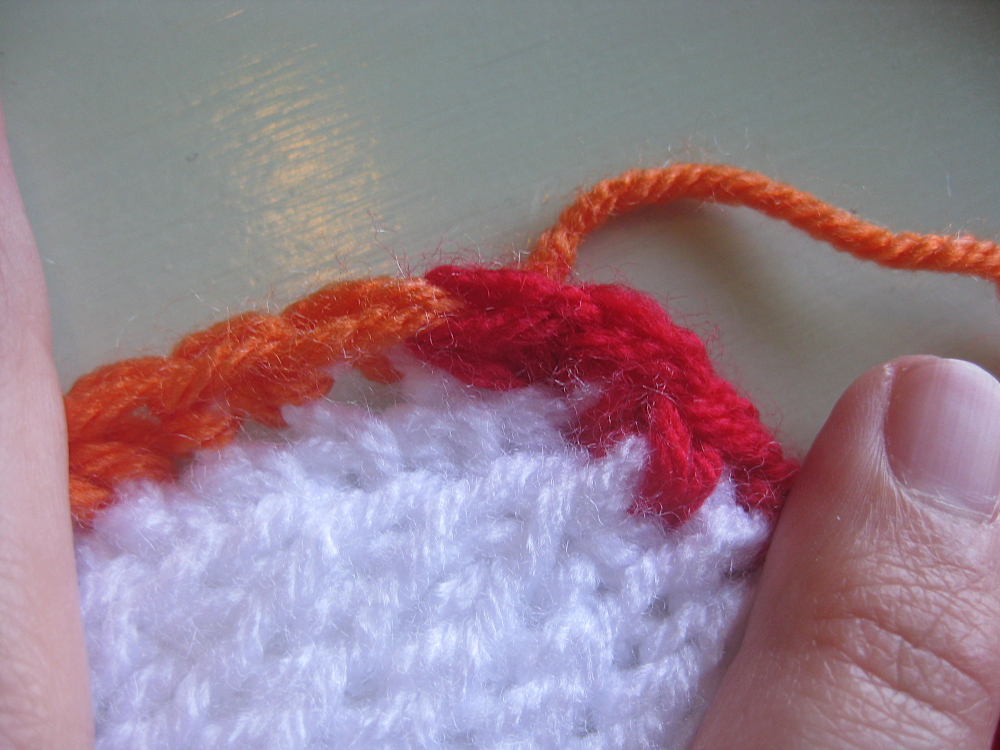
2sc in corner, then switch color (don’t cut yarn!) 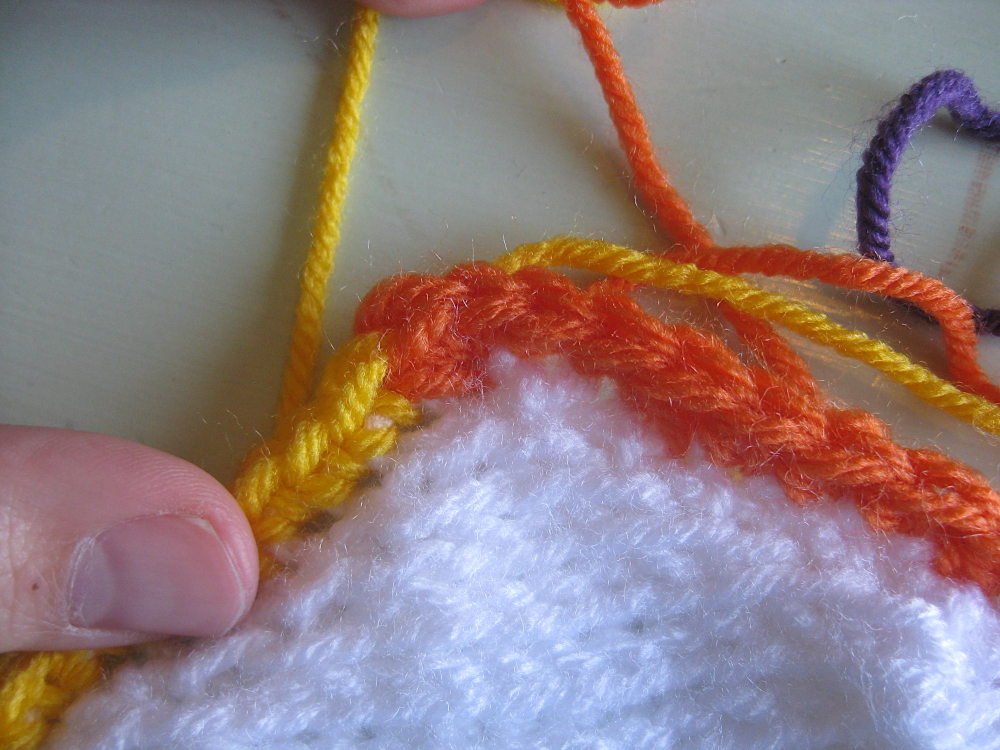

End of row 
Join to red 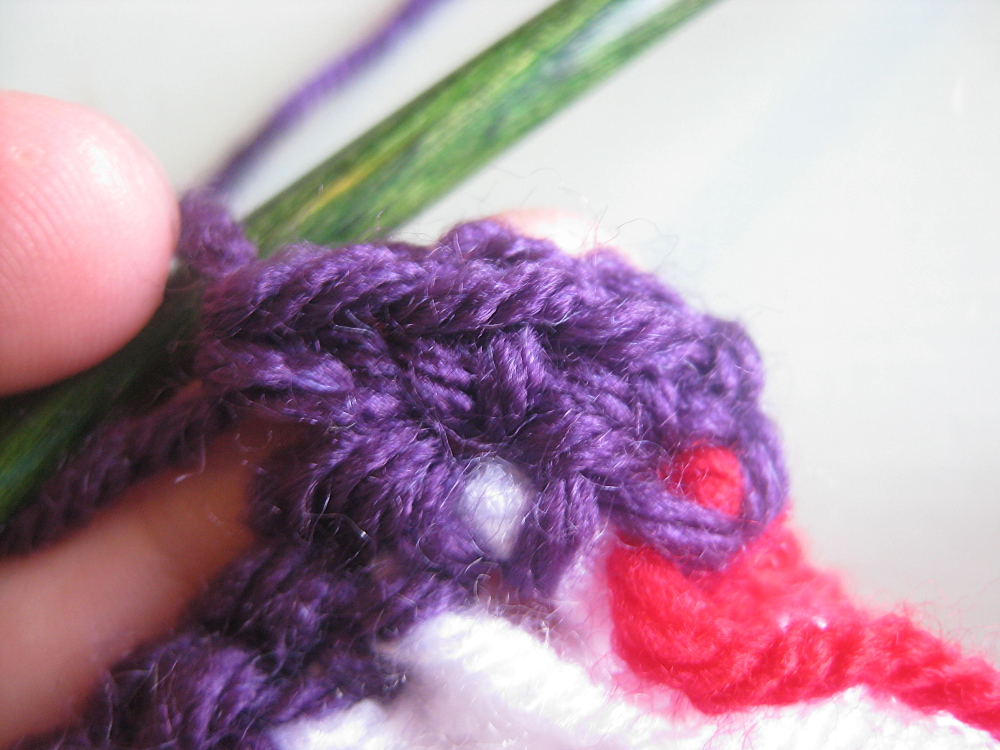
3sc in 1st st of second row 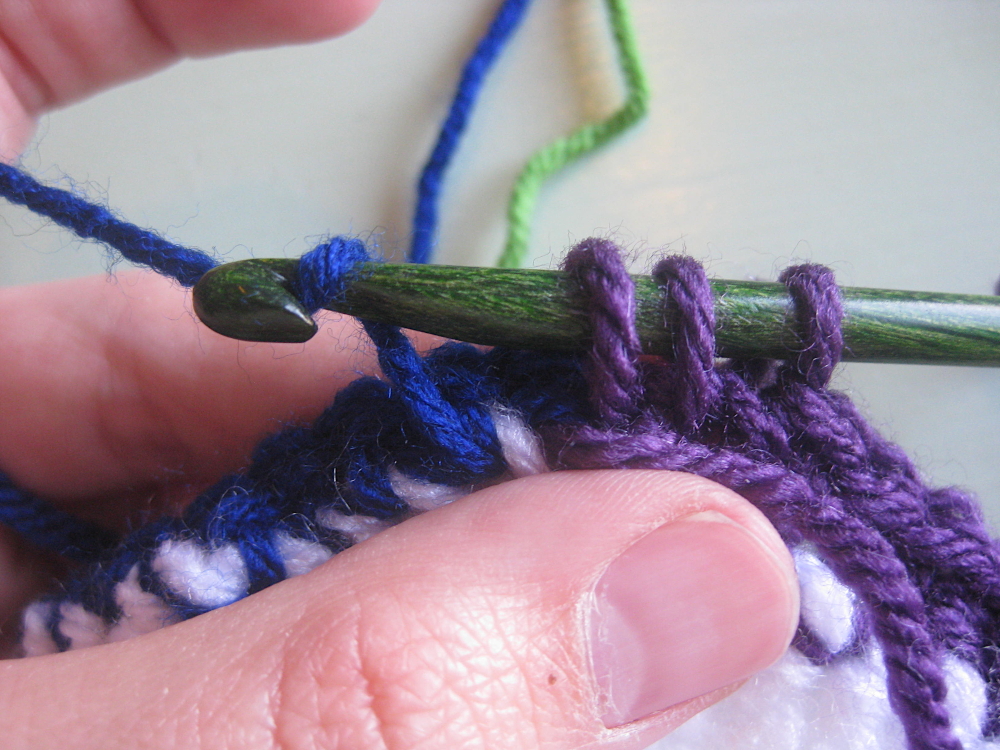
switch to blue, using yarn tail left from first row
Joining Blocks and Outer Border
You can, of course, choose to join your blanket squares together in whatever way you prefer. For this project, I chose to join them with a single crochet border. It creates a little ridge on the top for texture and I think it really makes the colors pop even more. It just looks cool. To do this, I put the squares together with the back sides together, joined white to the corners of each square to work a single crochet, then worked single crochet across the edge, making sure to go through the stitches on both blankets. You can see this in action toward the end of the video I posted above.
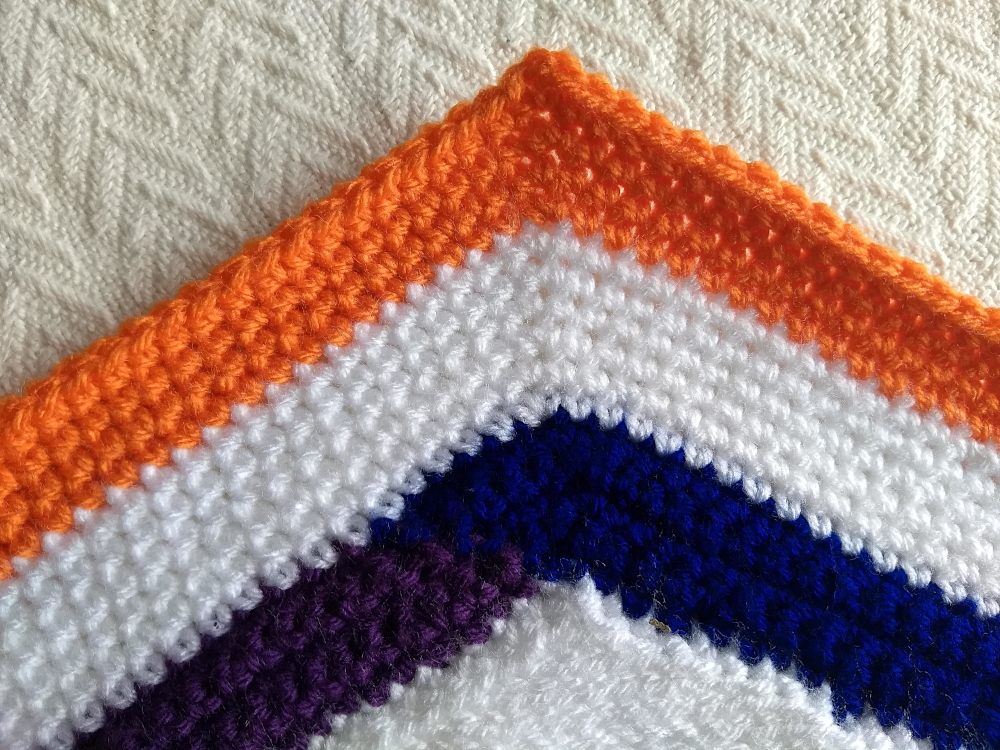
You can make the outer border, really, whatever you want it to be. I decided to do a single crochet border. I did six rows of sc around in white, then four rows of sc around in orange. Just make sure that as you go around you do 2sc in the outer corner stitches and a decrease in the inner corners to keep the blanket laying flat.
Have fun, and I can’t WAIT to see your finished blankets! I hope you can spread some love and find a special person to gift this to!
I couldn’t find in the pattern materials the hood size. At a guess, I am thinking that is and l/8.0mm. Is that correct?
I can’t believe I didn’t post that! Thank you! I am adding it to the supply list, but yes, it is a size I hook.
I think it’s wonderful that you offered such a beautiful blanket for such a meaningful course. Thank You.
Hopefully it helps spread some love!
Thanx so much for the quick response and the fix! This has become my new quarantine project and I was really bummed when I got stuck.
Take care and stay safe!
Such a beautiful and thoughtful pattern! I love it! Unfortunately, I seem to have hit a snag when working it. I’m trying to work row 16 of the infinity loop square, but the numbers don’t seem to work. I run out of stitches to work out of during the second ttks section. The stitch count on row 15 is good. Am I missing something? Thanx!
Hi Belinda,
Oh dear! I just double checked and it looks like I copied over row 16 incorrectly. The last ttks section should only have 11 stitches instead of 16. Thank you so much for contacting me and letting me know there was a problem!
Cheers, Mary
This is such a beautiful design. I love the subtlety of it, very classic. I’m a sucker for hexies, these are lovely.
Thank you, Stephanie!
I also just went through and double checked all of the other lines to make sure the stitch counts were correct. You should be good to go!
Mary